• Skip to primary navigation
  • Skip to main content

SCP Survival

Best Survival Gear and Supplies

  • Download Survival Guides
  • Survival Food List
  • Download 906 Survival Guides to Your Device
Home / Survival Food / Page 5

Survival Food

Low-Rent Indoor Hydroponics

March 22, 2024 by Seasoned Citizen Prepper

Growing Indoors with Hydroponics
This particular tank has been going for about 5 months (and recently cut back for a batch of pesto)

A lot of gardeners have told me that they’d like to try indoor hydroponics, but don’t have the hundreds or thousands of dollars required for they initial setup. If you’d just like to ‘get your feet wet’ (pun intended) you can probably get started with less than a $20 investment (especially if you have abandoned aquarium equipment laying around)

Hydroponics Parts List:

  • a cheap aquarium air pump and tubing (I had this in a closet, collecting dust)
  • a large-ish airstone – mine was $2.95 at a chain pet store
  • a container ( I was given a 1.5 gallon hex aquarium as a gift, years ago – too small for fish)
  • A plastic net bag – the kind onions and potatoes are sold in at grocery stores
  • A pack of plastic “wiffle” plastic practice golfballs from a megamart (think mine were $2.18)
  • some polyethylene cord (Dollar Store special)
  • (optional) some lava rock (the kind sold for gas grills – very light weight – about $3 a big bag as I remember)
  • fertilizer (organic compost tea would be great)
  • plants (start out w/herbs or lettuce or spinach, not tomatoes, cool as that may sound)
  • water
  • Duck tape

If you don’t have access to an old aquarium tank, don’t worry.  A small plastic bucket or small office-type trashcan will probably work even better.  I like to check the air flow, but the less light that hits the fertilized water, the fewer problems you will have with unwanted algae in the water. Pick a container that you can easily stick your onion bag inside. Pick something about 9-10 inch diameter and around a foot tall.

If you so choose, thread some of the poly cord through the net bag as reinforcement. This is mostly a hangover from earlier attempts to use pea gravel as a growing medium, but backup never hurts.

Place your airstone into empty tank, finagle and tape down the air tubing to keep it ‘right-side up’ (this can bite you later if you don’t)

Place your onion bag into tank, with a couple inches overlap on the outside of the tank. Tape around it to hold the bag in place (Note: I removed outer tape wrap layer so pic would be more self-explanatory). Leave an inch or 2 free space above the airstone to let bubbles spread.

Set the tank someplace warm with good light. (I use a shelf with a clamp-lamp and a daylight CFL bulb) Pour in your bag of wiffle golf balls – this is your growing medium. Very light weight, full of holes to allow air flow. Plug in the air pump, fill “most of the way” with water and your choice of fertilizer.

Let it run without plants a day or 2, just to drive off and chlorine, etc. as needed, where you are. If you can’t find wiffle practice golfballs, check your closest Dollar Store for the funny-looking hard pink plastic hair curlers. I used these once in a koi-pond as biofilter-medium instead of $30/lb “BioBalls” and they ought to work here too. All they do is support the roots and stems.

Being lazy, as I said, I plant sweet basil, because I can get it pre-started in hydroponic medium from a local organic hydroponic farm at my favorite supermarket. (rich yuppies DO have their uses..) To use other plants, start with a “2-inch pot size” plant, with good root systems, and gently wash off ALL the soil from the roots. PLEASE do this outside, not in your kitchen sink, or I promise, you will regret it while snaking and plunging the drainpipes. Shove the roots down inside the golfballs by hand.  If the plant tends to be too floppy or too ‘floaty” just stick in a lava rock or 2 to brace up the structure.

Operating instructions:

  • Keep the airpump running all the time – you dont want the roots to ‘drown’.
  • Don’t worry as water evaporates- let it get down to about 50% full before refilling with water – free air for the roots.
  • Don’t over-fertilize- if you start seeing green algae, use a LOT less for the next month.
  • If you use artificial light, make sure your plants get 6-8 hours a day of dark time, or they will turn yellow.
  • Trim the leaves and make pesto, if you grow basil – it grows like a ‘bat outta..”

p.s. if you haven’t heard of it, you should check out “aquaponics“, which incorporates fish into a hydroponic system.
Filed Under: Gardening

Food Storage for Beginners with Little Money

March 22, 2024 by Seasoned Citizen Prepper

There are multiple ways to build food storage. There is the long term, store it in a closet for years, for the “what if” scenario. There are emergency meals that store long term which are “just add water”, but expensive per calorie.

Then there is the “pantry building” way which is simply buying 2 or 3 of everything you get when you go to the supermarket. If you normally buy a package of spaghetti noodles and a jar of Ragu, buy several of each, keep them in the cupboard. By buying 5 of everything you normally buy (excluding perishables like lettuce) you have a month’s worth of food in a week.

Every time you buy something you already have, put the new stuff in the back and use the older stuff first. Keep adding a little all the time – like a piggy bank.

Things like canned soup, vegetables and fruit, ketchup, mustard and BBQ sauce, pickles, olives and sauerkraut last a lot longer than the “best by date” and it’s easy to catch sales. Cream of chicken or mushroom soup makes a nice sauce for white beans and rice. BBQ sauce adds zest to red beans.  A jar of salsa adds zing to pinto beans and rice, together or separate.

Get a couple dozen packets of dry gravy, sloppy joe, spaghetti, taco mixes. Tomato soup can be used with dry spaghetti, sloppy joe and taco mix as a substitute for tomato sauce. Bacon bits, granulated garlic and dry minced onions make nice additions to a variety of dishes.

Peanut butter is a great source of protein and keeps quite a while. Canned stew and chili should have a place on the shelf. I, personally, find Spam disgusting, but it lasts decades because of the nitrates. There’s canned chicken, tuna and salmon. Jerky lasts longer in the freezer than on the shelf, heads up, rehydrated it is nasty.

Some other cheap and easy items are oatmeal, cream of wheat, rice, dry beans, barley or split peas for soup in 1 or 2 pound bags, mac & cheese, ramen noodles, rice-a-roni, instant potatoes, pasta noodles, bisquick and stove top stuffing. Other than the stuffing, these things last well beyond the “best by” date. If space is an issue, keep them in a Rubbermaid tote.

A box of instant milk stores well for several years in a recyclable plastic bottle once opened.

Saltines last longer than bread, but not much past the “best by” date. Tortillas can substitute for bread and take little space in the freezer.

Save the freezer for things that can’t be kept for an extended period any other way. Grated cheese in a re-closable bag lasts months in the freezer. Buy meat in the family size or party pack and freeze it in smaller bags. ALWAYS keep the freezer full, any space should be filled with a bottle of water. It doesn’t have to work as hard when it’s full, so it costs less to run and if the power goes out it will stay cold longer.

Have you ever tried sprouting? That’s a great way to put fresh “greens” in your diet without going to the grocery store or having a garden.

Get some ‘feel good’ things, too, like jello and hard candy. Pudding doesn’t turn out very well with instant milk, but works ok with canned milk. If you want to get things like cake, muffin or brownie mixes, a can of dehydrated whole eggs is a wise move. You can store eggs for over a year in the freezer: beat a dozen eggs, pour them in an ice tray, when they are frozen put them in a ziplock freezer bag. Just take out what you need, let it thaw covered in the refrigerator, fry it for scrambled eggs or use it in a recipe.

Christmas time popcorn tins work really well for 25 pounds of sugar or flour and are rodent proof if that is an issue for you.

Coffee, tea, Tang, kool-aid, Country Time Lemonade: I always keep Country Time on hand because I never know when my sister-in-law is going to show up with a bottle of vodka. Gotta love that girl!

Baking soda for cooking, but can also be used for brushing teeth, an antacid, cleaning the bathroom and a hundred other things. Baking powder, yeast, brown sugar and shortening are also some things you might want to have on hand if you like to bake some things from scratch.

Salt, do yourself a favor and buy it in the big bag, it’ll last a decade without any fancy packaging as long as you keep it dry. With pre-made and fast food, we really don’t realize how much salt we eat and need. It’s cheap and the most basic seasoning in the world.

Add extra cooking oil while you’re at it. In a pinch, it can be used as a substitute for butter or margarine in mac & cheese, etc.  Whatever you do, don’t forget to have jugs of water stashed in case your services are down.

Variety is important, but if you find your “pantry” has some things you don’t normally eat, commit yourself to eating one of those less favorite items once a week until it’s gone. OR every couple of months you can have an “eat from the pantry” week where you avoid the grocery store completely and eat only what you have on hand.

NOT going to the store for a week or two will really let you see what you need to stock up on or what you will potentially be doing without–Make a list during this week. This method works well for soap, toothpaste and toilet paper, too. Once the pantry is stocked, you can replace what you use as it goes on sale, whenever you shop for fresh vegetables and meat.  Eating for a year from the pantry is easily doable if you have a solid survival food list to work from. If you prefer to buy prepackaged prepper food for long term storage for use years down the road, there are definitely some positives to that route as well.

Filed Under: Survival Food

How To Assemble a One Week Food Storage Bucket (19,253 Calories)

March 22, 2024 by Seasoned Citizen Prepper

I went to a food storage class a while back and someone there had packed routine shelf stable food – enough for one week – into a bucket.  I thought it was such a great idea.  A 7-day emergency food cache, with ready-made daily menus of “regular” grocery food.

I am imagining: Immediately after the bad thing happens and I’m all out of sorts, I can grab the convenient bucket and execute easy to prepare meals without using any brain cells. After we eat, the bucket may come in handy for …well … the other things that happen after you eat…

And, although it would be too heavy to carry in a bug-out situation, it would be a great grab-n-throw-in-the-car bucket.  Anyway, I don’t know the person or how to contact them, so I am attempting to re-create her idea using my food items.

My goals – feed 2 people for 7 days. 2,000 calories per day with some basic nutrition and variety. Everything must fit into a 6 ½ gallon plastic bucket with a gamma lid.  (I’m not planning to pack in a Mylar bag.)

Here’s what I have so far, but I’m nowhere near my 2,000 calories.

For the sake of this project, I assume that I have the ability to supply water, cooking and cleaning requirements separately. And oh by the way, if you decide to do something similar, I found that I can stuff the underside of the gamma lid with small items.  (tea, coffee, crystal light, P38 can opener, etc.)

p.s. if you are looking for more ideas, check out our complete survival food list. 

Breakfast Total Calories

Water Required?

Oatmeal, Quaker, individual packets (12 total)

1560

yes

Pancake mix, 5.5 oz.

660

yes

Syrup, Aunt Jemima, 8 oz.

400

Beef Jerky sticks (2 each)

100

Snacks
 4 Trail Mix Bar, Nature’s Valley

720

 4 Peanuts, Salted Planters, 2 oz.

680

 4 Oats & Honey Bars, Nature’s Valley

720

 4 Snack Bars, Misc. Flavors, Nature’s Valley

720

Starlight Peppermints – handful

100

Tootsie-Pops chocolate candy – handful

200

Drinks
14 Coffee, Folgers, Instant Individual, Packets

0

yes

 8 Lemonade Drink Mix, Crystal Light

0

yes

 8 Raspberry Drink Mix, Crystal Light

0

yes

 8 Wild Strawberry Drink Mix, Crystal Light

0

yes

 8 Cherry Pomegranate Mix, Crystal Light

0

yes

Lunch


Double Stuffed Ravioli, Chef Boyardee (2)

800

Raisins, Sun Maid (2 each)

50

Tuna, 5 oz can (2)

200

Tuna Helper, Box 7.5 oz.

700

yes

Powdered Milk Packet
Mac & Cheese, Kraft box 7.25 oz

780

Powdered Milk Packet
Beef Stew, Dinty Moore Cans 15 oz. (2)

800

Protein Bars, Nature Valley (2)

360

Peanut Butter, Jiff, crunchy, 18 oz.

510

Saltine crackers, 2 columns

200

Chicken, SAM’S Member’s Mark, 13 oz

350

Manwich Can 15.5 oz.

210

Baked Beans, Bush’s Can 16.5 oz.

490

Chicken Noodle Soup Can + Lipton Envelope

300

Protein Bars, Nature Valley (2)

360

Dinner


Beef with Gravy, Hormel Cans, 12 oz. (2)

520

Baked Beans, Bush’s Can 16.5 oz.

490

Green Beans, Can 14.5 oz

70

Chicken Chow Mien Dinner, LA Choy, 28 oz

540

Spam, Can 12 oz.

840

Sweet Potato Casserole, Glory 15 oz.

250

Cooked Ham, DAK, 16 oz. Can

800

Instant Mashed Potatoes, Idahoan 4 oz.

240

yes

Green Beans, Can 14.5 oz

70

Spaghetti Dinner, Kraft Box 8 oz.

800

yes

Tomato Paste, Hunts Can 6 oz.

150

Chicken, SAM’S Member’s Mark 13 oz.

350

Rice Package, Knorr 5.7 oz.

600

yes

Corn, Can 12 oz.

245

Corned Beef, Hormel Can 12 oz.

720

Instant Mashed Potatoes, Idahoan, 2 oz.

440

yes

Carrots, 12.5 oz.

158

Total Calories in Bucket

19,253

Total Calories per day for 2 people

1,375

Filed Under: Food Storage

How To Store Flour Long Term (4 quick tips)

March 22, 2024 by Seasoned Citizen Prepper

Flour is a food “staple”, and has been since the beginning of time. It makes an appearance on virtually every survival food list in existence.

Even so, very few people know these interesting and helpful kitchen tips on storing flour:

Flour Storage Tip #1: Use Potatoes To Reverse or “Save” Flour Going Rancid

You go to use your pre-ground flour and discover it has a slight “off” smell, or you tried it and it made your baked product taste “funny”. What do this mean? It usually means the flour has gone rancid, which grain does fairly quickly once it’s ground.

Can you save it?

Well, according to this tip, peel a raw potato and cut it in half; place the potato halves in the flour and keep it in the refrigerator or a cool pantry or basement overnight. Next morning, compost the potato halves and use the flour. I have not tried this, so, I’ll be anxious to know whether it works, but, picked it up from an LDS prep site, so, it probably does!

Flour Storage Tip #2: Use Bay Leaves To Keep Bugs Away

Tuck a dried bay leaf into flour before storing away and it will keep “critters” out (this is a time-tested method of keeping pre-ground flour bug-free).

Flour Storage Tip #3: Store at a Temperature of 75 Degrees or Less

Did you know that canned flour (#10 cans for long-term storage) may or may not last as long as you are told? If kept in a cool, dark place below 75 deg. F, it can last up to 10 years, as I understand it – we’re talking about pre-ground flour here – unground grain, properly stored, can last up to 30 years.

For every 10 degrees above 75 deg. F, however, the pre-ground, canned  flour loses strength and begins to deteriorate much more rapidly. You can easily cut shelf-life in half by storing your flour over 75 deg. F; even a short period of time over this temp will reduce shelf life.

Flour Storage Tip #4: Keep Your Flour in Mylar Bags (not paper sacks from the store)

Pre-ground flour in paper bags such as you buy off shelf should IMMEDIATELY be placed in mylar bags with OA’s (Oxygen Absorbers) and properly marked, then rotated in use according to expiration date, of course. They STILL need to be stored in a cool, dark place for longest life, even packed in mylars with OAs. Pre-ground flour can also be stored in freezers, which add about six (6) months to storage life.

Filed Under: Food Storage

Reorganizing the Garden Shed – $0

March 21, 2024 by Seasoned Citizen Prepper

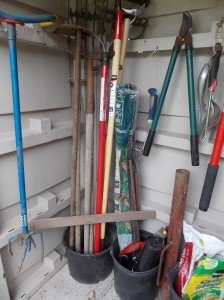
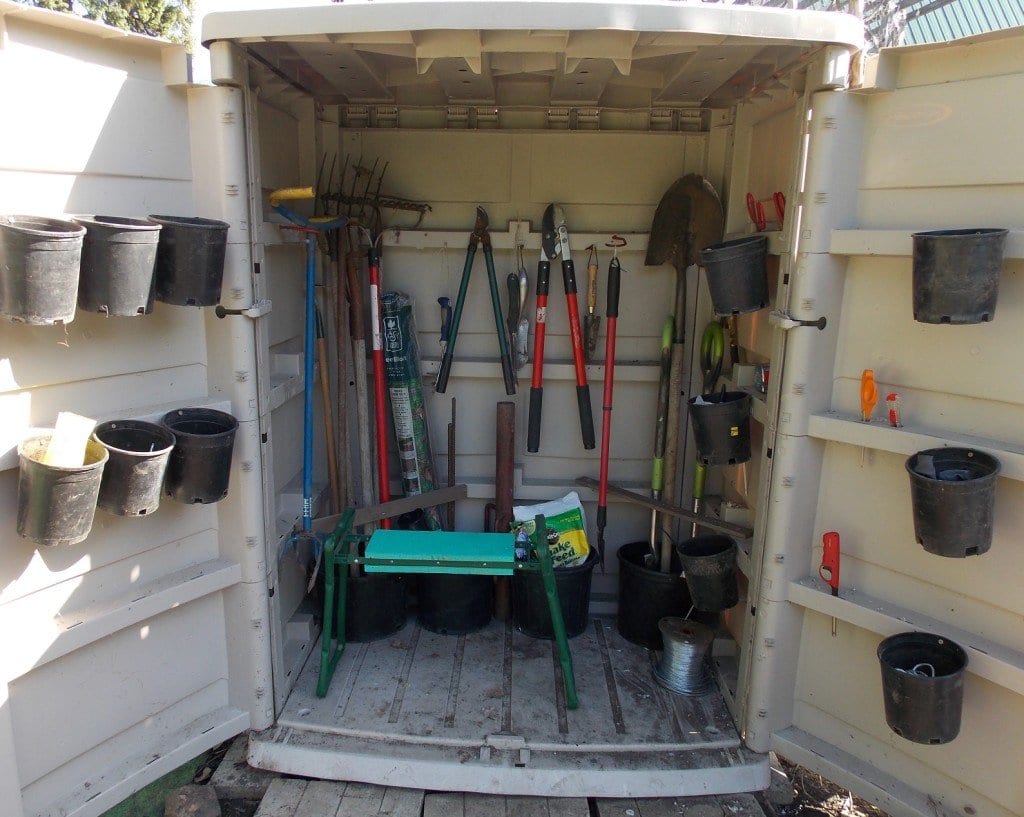
inside garden shed

I bought this little garden shed off of Craigslist a couple of years ago for $50. Surprisingly it has never tipped over in any of the storms even though I did not secure it in any way. It has withstood below zero weather, mountains of snow, and has proved itself handy in the garden. But I just couldn’t seem to get the hang of how to organize it.

I expanded the garden and needed to move the shed which I did. I keep a bench in the garden just to sit on and contemplate things and that is when I figured out how to reorganize this little shed to be much more functional than just holding a few hoes and shovels. Here is the overview…

We all have garden pots laying around. I grabbed the ones that were very well made, and screwed them onto the walls.

How fantastic! I now have storage for my garden gloves, seed packets, balls of twine and rope, plant markers and even several I haven’t filled yet, with room to add more!

So then I added some screws to hang stuff on. I’m using the star headed decking screws as they are weather resistant and I love the star heads – less likely to strip out.

So then I screwed four of the very large garden pots to the floor in the back of the shed. I had a couple of strips of that composite decking left over and cut them to fit in the corners to keep my hoes and shovels in place. You could use wood if that is what you have around.

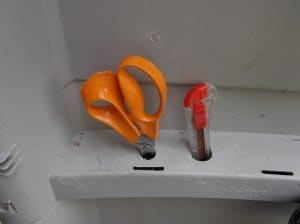
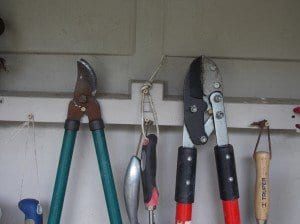
The middle buckets are handy to hold rolls of anything, fertilizer, whatever. The bonus was that my post driver fit between them. So then I drilled several holes to hold scissors, wire cutters, knifes, etc. I did these with paddle bits. Very handy.

A couple of hooks came with the shed and some tools just lend themselves to this type of hanging.

I have found a few more of those pieces of composite board laying around, so one of these days I think I will add a few horizontally to make some enclosed shelves for tools like the tape measure, etc.

When I was done, I even had space for my little kneeler/sitter seat. Once I had gathered my tools, it took less than one hour to totally reorganized this shed into a much more functional area.

Another big advantage? If I decide that I want to clean it all I have to do is take out the tools, etc. and hose it down! All the pots will drain automatically.

Filed Under: Gardening

Bev’s Favorite Garden Tools

March 21, 2024 by Seasoned Citizen Prepper

Gardening is work and good tools can make all the difference. I’ve spent a lot of money on garden tools through the years between rummage sales and buying new. Sometimes you think you have exactly what you need and you get it home and work with it, and well, it just doesn’t perform as expected.

Tools are also very personal to the individual. Your height, weight, strength and how you garden. I thought I would share some of my favorite tools and why they are my favorites.

First off, I love flower gardening with perennials. I have a lot of shade so I have a lot of hostas and hostas have wicked root systems. I also love daylillies and they too have some really tough root systems. I have several raised bed gardens for veggies, several square foot gardens, and have gone back to row gardening for certain crops. And a small greenhouse (although I wish I had the space to have this one). I do not have a rototiller or power cultivator – I do everything by hand.

I wish I would have bought this hose sprayer end a long time ago and am considering buying a couple of more when they come on sale. It is a shower wand. It turns on and off with a lever – yeah when you have arthritis! It sprays a gentle shower that doesn’t wash your seeds out, or your young plants, and yet soaks them to perfection. It reaches 4′ and has a rubberish grip so your hands don’t get cold either. I love it!

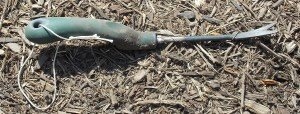
This little hand weeder is a surgical instrument in the garden. I actually have two of them. That dandelion or thistle in the middle of your strawberry patch or asparagus can be removed easily and quickly without hurting any of the plants you want to keep. The V in the middle lifts the tap root on plants easily.

Besides weeding it does a wonderful job of lifting individual strawberry plants (often in the aisles in the spring), small raspberry plants for transplanting, individual flowers or small groups for transplanting and will even work to plus in plants in an already established bed.

Another advantage is that it will act as a “mini-cultivator” in a square foot garden. Drag it between your mini rows and it pulls out the little weed seedlings quickly and easily. Extends your reach too.

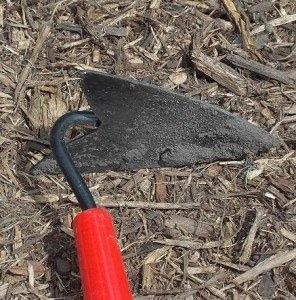
For row gardening, there is nothing like the standard arrow head hoe.  Chop, hill the potatoes, drag sideways across young weed seedlings, get in narrow spaces. I have a half dozen hoes, but this is my favorite.

Second favorite hoe is the stirrup hoe. You can drag it through the rows and it just slices off the young weed seedlings. Work it back and forth and you can almost dig a hole. Perfect for row gardens with open spaces.

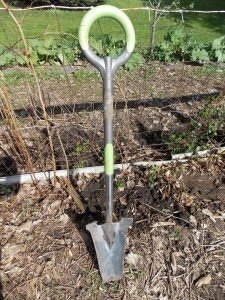
shovel Absolute favorite shovel in all the world! Went to a garden sale of daylillies and hostas and the guy was using this shovel to split and dig huge hostas! Yes it is pricey at $40 for a shovel, but well worth it!

Stainless steel one piece construction I believe. Can’t break it! I have broken a lot of shovels, even the expensive ones that say they won’t break. This one doesn’t break! It has a narrow, tapering blade with a SHARP end – perfect for cutting tough root systems. And I LOVE the cushioning on the handle.

Filed Under: Gardening

  • « Go to Previous Page
  • Page 1
  • Interim pages omitted …
  • Page 3
  • Page 4
  • Page 5
  • Page 6
  • Page 7
  • Interim pages omitted …
  • Page 14
  • Go to Next Page »

Copyright © 2026 · Genesis Sample on Genesis Framework · WordPress · Log in

  • Privacy Policy