• Skip to primary navigation
  • Skip to main content

SCP Survival

Best Survival Gear and Supplies

  • Download Survival Guides
  • Survival Food List
  • Download 906 Survival Guides to Your Device
Home / Off Grid / Page 2

Off Grid

Living Off The Grid Without Electricity – How One Family Does It

March 13, 2024 by Seasoned Citizen Prepper

Off Grid Living Without Electricity

I recently visited a land cooperative of 4 families owning 60 acres in a northern state. These families came together with a common dream of owning land in the country over 15 years ago, but that is where most of the commonality ended.  Each family has a home site, but also cooperatively makes decisions about land use.

One couple started building their home themselves in 1995. It is completely off grid, not even having solar energy and completely without electricity–by choice!

The thing that I find so unique about this off grid home, and the family that owns it, is the total absence of electricity. Most off-grid homes have an alternative source of energy that provides electricity—solar, wind, hydro…

What does no electricity mean? No cell phone, no radio unless battery powered, no TV, no lights, no running water… So many of the things that we are prepping to maintain, this family has chosen to either do without or found a non-electric alternative.

The pay-off to this homeowner built homestead? The only bill they have is ¼ of the property taxes on 60 acres of land!  Think about it, what would you be willing to give up for the freedom of having only one bill a year?

So, What is Life With No Electricity Like?

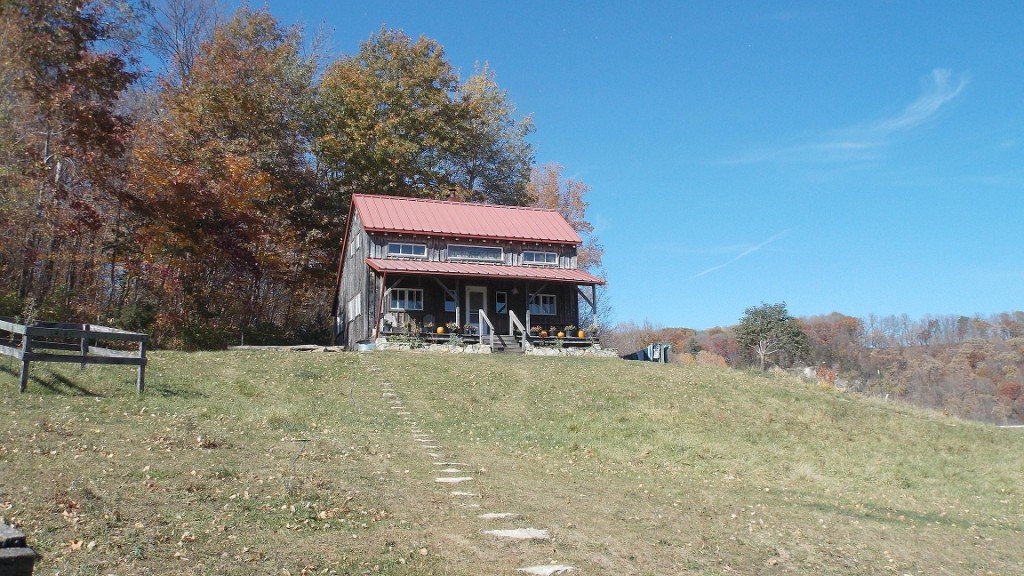
As I walked up the hill along the stone path to this homeowner built homestead, it felt like I was coming home. In the crisp fall air, the scent of herbs and flowers from the planters in front of the home drifted on the breezes to welcome me.

The ever present stump and axes heralded the sustainably harvested wood for heat and cooking I was to encounter inside.

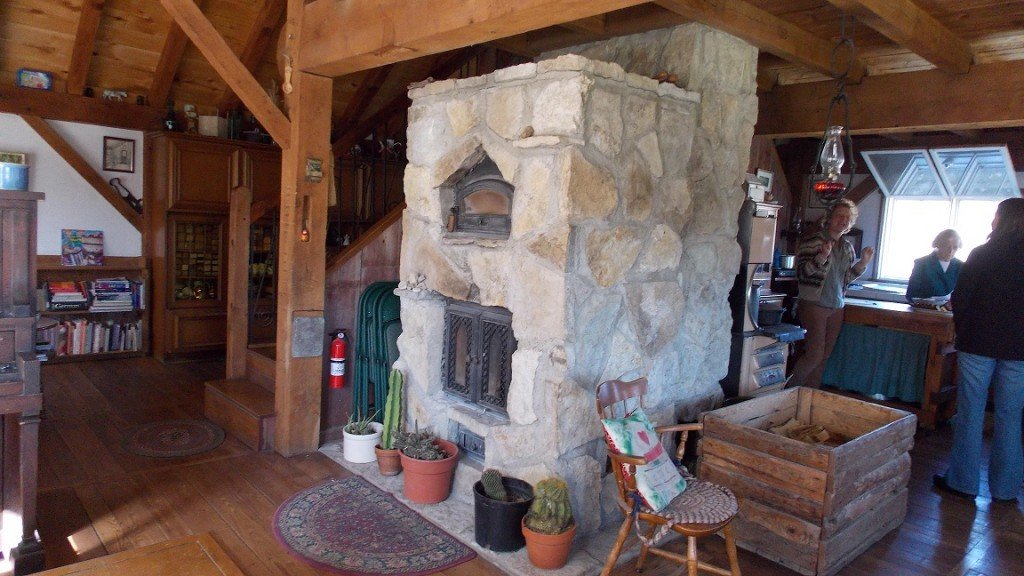
I entered the front door to be greeted by the masonry heater and wood cook stove. The antique oil lamp hanging above the wood box would be lit in the evenings to greet the residents’ home.

To the left was the living room with an antique—working–player piano that would fill the long winter evenings with music.

The Off Grid Kitchen
The wood cookstove on the left is the heartbeat of the entire off grid kitchen. Notice the hand pump sitting on the counter, and the extensive food stores in the distant pantry.

The Off Grid Kitchen

As I turned right into the kitchen I remember my great-grandparents’ kitchen, with the hand pump connected to the rainwater-filled cistern (the ram pump had long quit working by then), the aroma of baking bread coming from the wood cook stove, the careful tending of the fire, and the cheery glow from the mantels of the oil lamps flickering in the evening as grandpa would tell us stories of times past.

The wife had just finished baking squash bread and the aroma was heavenly.

The interior of this rustic home has the patina of recycled barn boards. The windows too are recycled and conformed to allow the breezes to flow through the home and cool it in the summer.

Off Grid Hand Pump In The Kitchen
An old blue hand pump can be seen here on the counter, reminiscent of times past.

Note the owner-built kitchen island with locking wheels, drawers on the side and curtained storage beneath, the blue hand pitcher pump next to the sink, antique hutch to hold glassware, and the ever present cast iron cookware hanging from the wall near the stove.

The wood cook stove is a true antique, refurbished by a professional restorer. All the food preparation and preservation on this homestead takes place on this stove.

This picture shows the tiled counter tops, pitcher pump and the ever present oil lamp. After a sip of hot apple cider and a bit of that delicious squash bread, I entered the combination prep room, bathing and storage area off the kitchen.

Wheat Grinder for Off Grid Cooking

The gleam of blue hued Mason canning jars filled with pantry items and spices was only rivaled by the wheat grinder firmly attached to the wood countertop.

I was invited down to the unheated basement. The conversation had gone to how the warm winter had provided no ice for the ice house and a propane refrigerator had been purchased to off-set this inconvenience. More Mason jars filled with the gardens’ produce lined the chill storage area.

Food Storage for Off Grid Living

It was obvious that this home had been carefully planned to be not only a sustainable retreat, but also of comfort to the family it housed. For me, it was a link to memories long forgotten.

Sharing The Land With Others in An Off Grid Community

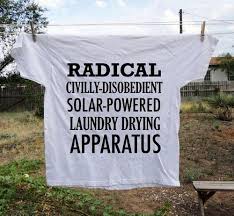
As mentioned earlier, they are one of four families sharing 60 acres together, with each family choosing to live slightly differently. Some families choose to have solar panels or other means of electricity on their property.

One family that started a few years later and have a full solar array next to their home. Two of the families visit on weekends and help when they can on communal buildings. Someday they may decide to build, but not in the near future.

There is a communal house on the property that is shared by families, visitors, and interns when they visit, and there is even a teepee.

Shared Housing For The Off Grid Community


This is part of an off grid series, where I take you on a tour of the off-grid home without solar assist and a walk around the farm.

If you enjoyed this post, be sure to check out the other posts featuring their: masonry heater, off grid water systems, gardening efforts, and homestead businesses.

My hope is that you will enjoy the experience as much as I did and perhaps learn, or remember, a bit of an older/newer lifestyle.

Filed Under: Off Grid

How To Make a Solar Grill [Easy DIY]

March 8, 2024 by Seasoned Citizen Prepper

How To Make a DIY Solar Oven (1)

Solar cookers harness the power of the sun’s rays to heat and cook food. Because they use only the sun, they are not reliant on a source of fuel, like propane and wood stoves are. This makes them great as a backup cookstove for emergency situations.

Also known as “solar ovens”, “solar grills”, or “solar stoves”, these cookers are also awesome for people that live off-grid full time. While off-gridders will usually have a wood or propane stove for their primary cooking needs, having a solar stove allows you to take advantage of sunny days and save fuel. It’s also cleaner, quieter, and doesn’t emit any smoke or fumes.

There are a million uses for a solar cooker. They can be used to bake bread, cook chicken, heat water, make soups and stews and tons of other things.

So, how do solar cookers work?

To put it simply, solar cookers operate on the principle of reflection. With multiple panels that can be adjusted to capture maximum light, the sun’s rays are then reflected into the center of the stove, to create a concentrated area of heat (much like you might do with a magnifying glass).

What are the main types of solar cookers?

If you are looking around at these suckers, you will have already seen that there are basically 4 main types of solar ovens, that look and function slightly differently.

Solar Box Cooker

1. Box Cookers

This group includes the most conventional, “box with a lid” looking cookers. Most of them are rated to cook as high as 200-300 degrees Farenheit in good conditions.

Panel Cooker Solar Cooker

2. Panel Cookers

These are the more scaled down, cheaper models that you see. They can be great cookers and are generally on the more affordable end of the spectrum, although their construction isn’t quite as sturdy, and coatings not always as reflective as other cookers.

Solar Cooker Parabolic

3. Parabolic Solar Cookers

Also called “curved concentrator cookers”, these are the things that look like metallic satellite dishes. They can heat up to 600 degrees, but they use a tiny little cookpot, making them not a good fit for many uses.

Gosun Style Solar Cooker

4. Gosun Style “Grillers”

The Gosun unit (and other similarly styled solar ovens) are nifty but a little limited in size/application (everything has to fit in that little tube). Plus, they are expensive as hell!

Within these 4 different types, you will see millions of different little homemade variations. You will also see some types of stoves that don’t really fit into any of the styles above (such as the tire cooker), but by and large, these are the main styles that you will see.

How long does it take to cook in a solar oven?

Like you might guess, it depends on what you’re cooking and how much sun is out when you’re doing it. It also depends on what type of solar cooker you are using, the size of your sun panels, the thickness of the pot you are cooking with, whether there are clouds in the sky, and even things like the temperature and altitude where you are cooking (although with solid enough sun, you can cook just fine even in freezing temps in the dead of winter).

Here is a handy chart of rough time estimates to cook 4 pounds of food on a sunny day:

How Much Time Does It Take to Cook With Solar Cookers?

How much do solar cookers cost?

Commercially available solar stoves can be expensive. The official “Sun Oven” is listed at $349 (although you can usually find it for quite a bit less online). Folding panel cookers are less. The Sol Cook comes is very popular and sells for just under $100. As mentioned above, the Gosun is extremely expensive, with their “grill” model selling for $700 (I actually saw it on the Home Depot website listed for $822!).

However, there are also plenty of folks creating their own DIY sun ovens. With a little ingenuity and some household materials, you may just be able to come away with a cooker for much less.

DIY Solar Cooker Made Out of A Sun Shade

There are several different kinds of DIY solar stoves out there. One that I had often seen is an oven made out of a reflective windshield sun blocker. I finally made one, and when I did, I was surprised at the results. Works pretty good!

solar oven 4 shade

What You Will Need:

  • Large reflective sun shade (Walmart, gas station or Amazon)
  • 5 gallon bucket
  • Oven bags (like the kind you roast a turkey in)
  • Dark-colored pot
  • Clothes pins, or something else to hold the sun shade in its conical position

How To Cook With It

Solar Oven 3

I picked up a sunshade for $2, clipped it together in a conical/parabolic shape (like the pictures above), and added a five gallon bucket underneath.

Solar oven 1

Put your food in the pot, and then place the dark-colored pot inside the oven bag. It takes a few hours and works best if it is above 60 degrees, but you can cook without fuel!

solar oven 2

The Slightly More Heavy Duty Solar Cooker

The sun shade solar cooker is awesome and does work, but it certainly isn’t heavy duty. If the pot is too heavy, the sun shade alone will not be able to support it. Then if it’s too light, it can be blown over in winds. Even if it isn’t blowing over, the sunshade itself can be blown around in the wind, causing less consistent exposure from the sun’s rays (and less heat).

For these reasons, I decided I would try my hand at putting together a slightly heavier duty solar cooker.

2 boxes

I scrounged up 2 plastic boxes in the basement. The bigger one is from some kind in-ground fountain that someone gave me, and the other one is some kind of bin.

Yes, the outside box could have been cardboard, but with snow and rain in Minnesota, and the potential for dogs getting into my meal, and given that I had one on hand, it just seemed like the thing to do. After all, the goal with this cooker was heavier duty.

insulation

I put a sheet of clear plastic in the bigger box and put a garbage bag around the smaller box. Then I put the smaller box into the bigger box and stuffed insulation all around it.

I pulled the smaller box out and taped it thoroughly. YES, I know that this insulation is frowned upon because of fumes, but in Minnesota, I believe in insulation! It is also thoroughly taped and as you will see, it will have a Mylar coating on it so that it should never even get warm.

lined box with finished edges

Mylar on top of the insulation to reflect the sun’s rays and Mylar on the sides of the inside box – not sure about that yet, but I have another box with no Mylar that I’m going to test.

frame on box

Then I looked for an old picture frame that I could use as a lid to the cooking chamber. I swear this solar cooker was meant to be because I had a picture frame with glass that fits it perfectly!

cardboard top and sides

At this point I still wasn’t sure this was going to work, so I just cut my sides and top out of cardboard and siliconed on the Mylar. Then I duct-taped the flaps onto the box for a trial run.

oven bag and granite ware

A dark colored pot is preferred with solar cooking. The reusable oven bag is to add more heat and capture the heat from the pot.

cooker in snow bank

This is the first test run. Got to 150 degrees in that snow bank!

almost done

This proved to me that it would work, so I cut up some quarter inch plywood I had laying around and re-siliconed the mylar onto the wood.  I drilled holes in the wood and corresponding ones in the plastic, and used cable ties to hinge the flaps.

I put screws in the two outside flaps to lean the back on, for times when I wanted to get the solar rays at a better angle, and used garden twisties to hold them together. Then, I siliconed the glass to the picture frame, and ran some foam strip sticky seal that I had around the frame to ‘tighten” it a bit more.

So far so good!

screw

I then put a screw in the frame so that I could tell where the full sun was. I have been experimenting with this, and the last test I did, the temperature was about 15 degrees Farenheit, and I got it to 225 degrees – not to shabby (this was with the cooker sitting on the garbage can, not in the snow).

More Iterations and Refinements

Although 225 degrees is pretty solid, I still want to refine this more.

I’m thinking another panel on the front. And a way to tilt it up. The cable ties snapped at just 5 degrees above zero so I replaced them with electric fencing wire. And I am looking for a glass container to put the cooking pot in because the glass will amplify the solar heating.

bottom adjustments

To make a riser for tilt, I cut three strips of wood and siliconed them onto the bottom of the box.

box riser

Then I took a scrap of 2×4 and a board, screwed them together to complete the riser.

3 screws

Well, then I had to add more screws to the side flaps  for more adjustments on the top flap.

more finished

I added a bottom flap that I made adjustable just by drilling a hole on either side of that and a hole in each of the side flaps and lacing garden plant ties through it.

Oops! Got so hot it warped and melted holes in the inside plastic box! So then I took some aluminum flashing scrap I had around and made an aluminum box for it, painted it black – I need to keep my eye out now for an old metal box, maybe a bread box or something for the inside.

All in All

So, with materials I just had laying around the house I created this solar cooker that is pretty much weather resistant, dog and cat resistant, not nice enough where anyone would want to walk off with it, and it all folds into itself so it is easily stored.

Why should I bother doing this now? My experience has been that even though someone on YouTube or in an article can do this or that, doesn’t mean I can. And there is always a learning curve! It didn’t cost me anything and I have the time right now to build it and learn how to use it.

If the grid should go down tomorrow for a month or a year, how will you cook (in reality, not in theory)? Do you have what you need and know how to use it?

Videos, Plans, and More DIYs

Printable PDF – One of the best downloadables I’ve found on solar ovens, how to make them, and how to use them. From Solar Cookers International.

Solar Cooking Wikia – Several plans and DIYs (basically the motherlode of all things solar cooking)

Solar cooking IS a PROVEN technology. That said, you have to have sunshine. In Minnesota the sun does not always shine, and it gets cold. At this post, we are again below zero at night… Will winter ever end???

Because the sun does not always shine, I am also creating a thermal cooker that can be used whether there is sun or not. Much like a Wonderbag, the thermal cooker I’m making is kinda like an off grid slow cooker. If interested, check it out here.

Filed Under: Off Grid

Reviewed: Best Indoor Rocket Stove [Deadwood Stove]

March 8, 2024 by Seasoned Citizen Prepper

Deadwood Indoor Rocket Stove

After viewing many videos on YouTube, I decided to purchase the Deadwood Stove. Seemed like the best value for the money. And I can say that I am not disappointed! It arrived promptly and I was totally impressed with the quality, construction and good leather gloves that were included.

I like these stoves so much, that now I even have two Deadwood Stoves! These are, to my mind, mini-wood stoves that are so well built they will be passed down for generations.

I’m old and disabled, so weight is a concern for me. The Deadwood Stove is 18 lbs. Not light, but for the quality of construction it is made for durability—5 year warranty. This is a mini-woodstove–I’m guessing 50 years plus. The Deadwood Stove is something you can pass onto the kids. This makes the $250 I spent on my gas grill look like money ill-spent as that, even though it is stainless steel, is already rusting (1 year old!).

6 Month Update on The Deadwood

I’ve had my Deadwood Stove for about six months now. I’m thrilled! Here are a few of the high notes:

  • With dry sticks and pinecones it boils a quart of water within 10 minutes.
  • I keep one (Yes, I actually have two now!) on top of a table on the patio so I don’t have to bend over.
  • It has removable legs, so it is perfect on a tabletop.
  • The legs have a slight adjustability
  • Roasted marshmallows within three minutes!
  • You can grill a steak (or tinfoil anything) to perfection directly on top of the built-in grill just by adjusting how many sticks you feed into the front of the stove.
  • Wind blowing the wrong way? Just turn it! Works best facing the sticks into the wind—no smoke!

I put wood chips in a tin foil pan in my propane grill to get that delicious wood smoke flavor… Turn the Deadwood Stove slightly angled to the wind and you don’t need to add smoke! Actually, I’ve been contemplating how I can use a Deadwood to create a smoker. I’m sure it can be done; I just have to figure it out.

With two Deadwood Stoves you can pretty much do a meal. My two Deadwood Stoves have almost made the propane grill obsolete! And between we use them camping and the kids also using them, the savings in not buying firewood at state parks has already paid for both in one summer!

Deadwood Stove Used Indoors
Deadwood Stove being used with alcohol-soaked cotton balls inside of a can

Only problem… The kids! Expect that they will borrow one for every camping expedition. The son even uses it on his pontoon boat! And my husband takes it with him on his Harley when camping!  And if two of the kids go camping at one time, well, you are sans your Deadwood Stoves. Not good if you get the grandkids.

My son even sidled up and asked who was going to inherit the Deadwood’s (He already has dibs on the 12 gauge and .38)! Not cheap, but they are definitely worth the money.

Can You Use The Deadwood As an Indoor Rocket Stove?

With the bitter cold winter we have had this year and the electricity going on and off, I got to thinking about the Deadwood for interior cooking as well. Sorry, but I am not going to feed sticks into a rocket stove outside to cook when it is -20 with wind chills of -50.

It IS Minnesota!

WOW, am I impressed! For cooking all I did was clean out a spaghetti sauce can, tear off the label, stick it upside down inside the Deadwood for height, then I took a cleaned soup can with label torn off, put 10 cotton balls in it, poured maybe a half a cup of rubbing alcohol over that, let it soak-in good for about 15 minutes, lit it with a BBQ lighter and I had water too hot to touch with steam rising within 5 minutes!

Plenty good enough to cook on!

Deadwood used with a simple candle

The Deadwood cooked okay with just a common candle too. But I think that a three wick survival candle would work a lot better. I also tried putting one of those pocket stoves in it with a fuel tablet and that worked great!

The legs on the Deadwood are positioned to make the stove easy to cook on just sitting on a chair. Remove the legs and you have a counter top or table top stove where you can easily stand and cook.

Below the grate the Deadwood is a bit less than 5”x5” , so Sterno fuel, camp heat, survival candles, fuel tablets, nearly any kind of solid camping fuel, can be used with it when you are indoors (and of course sticks for outside).

The only thing you have to be careful of if you are cooking indoors, is not to put too big of a pot on it that snuffs out the fire. And that may not be a problem because it can draw oxygen from below it also.

This is a very versatile, indoor-capable rocket stove!

Deadwood Is Also Awesome for Outdoor Cooking

We like to grill on the back deck. I like my propane grill, but it doesn’t have a burner. And the more I grill, the more I would like an extra burner for boiling corn-on-the-cob, sautéing mushrooms and onions, whatever.

The grandkids come over and want to make s’mores. Even though I have a fire ring down by the creek it is a chore to start up a campfire for 10 minutes of roasted marshmallows and then they are off to something else.

We have lots of tree–maple, birch and various spruce trees. We have branches come down in every storm and a lifetime supply of pine cones! So I have been looking at rocket stoves using biomass (sticks and pine cones), for perhaps two years now. Weighing the pros and cons and trying to decide what I really want from it.

Did I say money was tight? Everything I purchase has to work for multiple purposes.

Awesome Stove for Emergencies, Grilling, or Camping

If the power goes out and no natural gas is available, how am I going to cook? The propane grill will only work for so long and only for so much, so the Deadwood could come in handy there.

But what if nothing ever happens? How can I use a rocket stove to justify the purchase? I NEED at least one extra burner on the deck near the grill. I could satisfy the grandkids with their s’mores and hotdogs without creating a bonfire, and the kids could gather the twigs needed to fire it—yard cleanup.

It would definitely be handy for our camping excursions and would save us money by not having to buy firewood at the site (Minnesota is currently under a ban for unauthorized firewood being brought into parks due to an emerald ash borer infestation threat). And…. the kids could borrow it.

Filed Under: Off Grid

DIY Masonry Heaters [pictures and diagrams]

March 8, 2024 by Seasoned Citizen Prepper

The heart of a homestead is the hearth. And when our off grid family was making building decisions, the choice to have a masonry heater was the first one they made.

Their masonry wood heater was a DIY project built from native limestone and includes a baking oven. It was built in the center of the home so that its warmth could radiate outward and upward to keep the whole home cozy and warm in the northern winters.

Only the doors, firebrick, piping and mortar were purchased to create this mammoth heater. The cast iron doors were purchased from a masonry stove dealer in Vermont, and the rest locally.

So just how efficient is it? 

Well, the owners of this masonry stove said they only need to burn a fire once a day to keep the whole house warm unless it is below zero, then two fires a day suffice. And they only used three cords of wood between the masonry heater AND the wood cook stove last year!

I was very impressed with that, given that I used an average of seven cords of wood every winter for my very efficient wood stoves.

The upper stove is a baking oven. The owners often bake bread and pizzas in the oven, just after the fire has died down, or use it was a “warming drawer”.

In the basement, directly below the masonry stove is this ash can—a large galvanized trash can. Note the strength of the cement block wall to hold the weight of the stone above it. If you have ever dealt with wood stoves you realize immediately how convenient this is to clean out the ashes! Plus the wood ash is excellent for making lye and enriching the garden (do not use wood ash where you plant potatoes as they will scab).

With the masonry heater being the first decision that was made in building this homestead, the rest of the home was designed around the concept. Heat rises and fills the upstairs sleeping areas with warmth. A round antique heat vent in the upstairs of the home allows the radiant heat to rise more efficiently than just through the stairwell.

A Brief History of Masonry Heaters

The earliest known use of masonry heating technology dates back all the way to the Neoglacial and Neolithic periods of human history. These ancient civilizations are said to have used the smoke of fires to provide radiant heat for their underground homes. 

In all of human history, the Kang bed-stove is one of the earliest known instances of modern masonry heater technology. From as early as 5000 B.C., these Chinese “bed-stoves” were multi-person dwelling units primarily made of huge blocks of masonry to retain heat in colder climates. Around the world, forms of masonry heat grew organically in low temperature areas like Eastern Europe and Northern Asia, adopting various forms and names in countries like Russia and Sweden.

Eventually, masonry heaters lost popularity to forms of electric and gas heat found in most homes today. With that said, masonry heaters have seen a renewed popularity in recent years for its ability to provide a sustained off-grid source of heat. 

Other Names for Masonry Heaters

Masonry heaters have been used in many different cultures and have therefore been called several different names. Here are some of the most common alternative names for masonry heaters:

  • Masonry Fireplace
  • Masonry Oven
  • Masonry Furnace
  • Masonry Stove
  • Russian Stove

Additionally, some masonry fireplaces are covered in tile. In these cases, a masonry oven can be referred to as a: 

  • Cocklestove
  • Kachelofen
  • Tilestove
  • Or Ceramic Stove

Why do People Like Masonry Heaters? 

People have been using masonry heaters, or early forms of the device, for thousands of years. This is because they are one of the best ways to heat a home for long periods of time, without being overly expensive to run. 

Masonry fireplaces can easily warm a dwelling for an entire day, with very little upkeep required. Primarily, masonry furnaces are fueled with firewood. In the right areas with a lot of tree coverage, this makes the system very sustainable and inexpensive for ongoing use. 

How do Masonry Heaters work?

Masonry heaters are devices that can be used to warm an interior space with radiant heating (similar to baseboard heaters, or hydronic heating in a floor). As they are named for the material, masonry heaters are made up of masonry, which is typically brick, soapstone, stone, tile, stucco, or a combination of several materials. 

To put it simply, masonry heaters work like a sponge. A wood fire is burned rapidly, usually one to two hours. Heat from the fire is captured within bricks, stone, or tile and “soaked in.” Once these materials have been warmed, they will continue to radiate heat for many hours. In an enclosed space like a living room, the radiant heat from a masonry furnace can be used to keep interior temperatures high, even in the dead of winter.

Masonry heaters are designed to be easy to both use and clean. Typically, a masonry furnace can be loaded with firewood and burned safely with the smoke escaping through a chimney. When in use, there are a few basic mechanical features that allow for people to safely operate the system, maximizing the amount of heat without comprising safety.

Upkeep is extremely important when considering the lifetime of a masonry heater. In addition to continuously unloading of the burnt ashes, the interior of a chimney should be accessible so that it can be properly cleaned regularly.

Filed Under: Off Grid

7 Best Off Grid Washing Machines

March 8, 2024 by Seasoned Citizen Prepper

Best off grid washing machines for cabins, RVs, homesteads and emergency preparedness

Off-grid laundry comes up for two reasons: people who want real independence from the electrical and water grids, and people who want to cut costs. Both are legitimate — and the options today are genuinely good, ranging from a $50 hand-crank you can use anywhere to compact electric units that run on 310 watts of solar power.

An off-grid washing machine is a necessity for anyone spending significant time away from conventional infrastructure, whether that’s a cabin, an RV, a homestead, or an emergency situation where the grid is down. Here are the seven worth your attention, followed by what to look for when choosing, a DIY section, and honest answers to the most common questions.

The Short Answer

1. Giantex Full-Automatic Washing Machine

  • 10 programs and 8 water levels
  • 9.9-pound capacity
  • Child lock function
  • Automatic load balancer
Giantex full automatic portable washing machine

The Giantex Full-Automatic is a solid first pick for cabin, camper, or RV use where you have power available. Full control over washing functions, water levels, and delays through an LCD display. The child lock is a genuine daily-use feature — it locks all buttons and alarms if the lid opens, useful with kids underfoot. The clear lid lets you watch the wash progress and catch an unbalanced load before it becomes a problem.

The cabinet is only 33.6″ x 19.8″ x 19.7″ and fits in nearly any nook of a cabin, boat, or camper. Hook the water inlet to a faucet, position the drain hose, and set your program. The auto-balance feature pauses the cycle and redistributes an unbalanced load rather than shaking itself to pieces.

Other Great Off-Grid Washing Machines

2. Panda PAN6320W

  • 10 programs and 5 water levels
  • Built-in drain pump for quick discharge
  • Quick-connect adapters for standard faucets
  • 10-pound capacity, 310W
Panda PAN6320W portable compact washing machine

The Panda PAN6320W is one of the more capable electric portables: a built-in drain pump (not just gravity drain) means you can position it at floor level and run the hose up to a sink rather than needing the drain outlet level with wherever the water goes. The 55-inch drain hose and included faucet adapters make it genuinely plug-and-run in most setups. Casters mean you can move it without lifting.

One honest update since this article was first published: the Panda PAN6320W has shifted into the $235–$340 price range, a significant increase from where it launched. It remains a well-built machine, but at that price point you should comparison-shop the current Giantex lineup, which offers comparable performance at lower cost. The Panda’s 310W draw is gentle on a solar battery bank — that remains a genuine advantage for off-grid electric use.

3. Giantex Portable Mini Compact Twin Tub Washing Machine

  • 11-pound wash capacity, 6.6-pound spin-dry capacity
  • Dual water inlets
  • Separate wash and spin timers
  • 260W wash / 140W spin, gravity drain
Giantex portable mini compact twin tub washing machine

The twin-tub design does something the single-tub automatics don’t: you can wash in one tub and spin-dry in the other simultaneously, which speeds up your laundry workflow considerably. The dual water inlet lets you add a small rinse to the spin side to get residual soap out of clothes while they spin dry. At just under 30 inches tall it fits under most counters and tables — a real storage win in a small cabin or camper.

4. KUPPET Compact Twin Tub Portable Mini Washing Machine

  • 18-pound wash capacity — the largest in this list
  • Pump drain, 56″ drain hose
  • 1300 RPM spin dry
  • 280W wash / 140W dry
KUPPET compact twin tub portable mini washing machine

If you’re doing laundry for more than two people, the KUPPET’s 18-pound capacity is the practical answer. Most portables top out at 10–11 pounds — the KUPPET nearly doubles that without a dramatically larger footprint (33.4″ x 27.9″ x 17.3″). Three simple dials for wash timer, wash selector, and spin timer. The pump drain with a 56-inch hose means you set it up once and drain to wherever you want without repositioning the machine. For a family off-grid or in an extended emergency, this is the workhorse pick.

5. SUPER DEAL Portable Compact Mini Twin Tub Washing Machine

  • 8-pound wash / 5-pound dry capacity
  • Dual water inlets, gravity drain
  • Spin-tub cover plate
  • 26 lbs — lightest electric option here
SUPER DEAL portable compact mini twin tub washing machine

At 26 pounds and 26″ x 13″ x 12″, this is the most portable of the electric options — light enough to pick up and move, small enough to store just about anywhere. The pulsator agitates without bunching and throwing the tub off balance. Fill the washer side, run the 15-minute timer, transfer to the spin side with a small rinse water addition, spin dry. The cover plate on the spin tub is a small but practical touch — it keeps nearly-dry clothes inside during the spin and cuts down on splashing. Quiet when balanced.

6. Wonder Wash Compact Washing Machine

  • 5-pound capacity
  • Fully non-electric — hand crank only
  • Uses ~90% less water than a standard washer
  • Lever latch lid, gravity drain, ~$45–65
Wonder Wash compact non-electric hand crank washing machine

The Wonder Wash is the one fully non-electric option most people have heard of, and for good reason — it actually works. A slow hand-crank tumbles the drum and agitates the clothes. The 5-pound capacity is small, but a 2–5 minute wash cycle means you can do several loads in an hour without the fatigue of hand-wringing everything. No electricity, no hookup, no moving parts that require maintenance. The lever-lock lid replaced the old screw-on design and is genuinely faster to use.

At ~$45–65, this is the lowest-cost entry point on the list, and it’s the right answer for solo use, for situations with no power at all, or as a dedicated “delicates and small loads” companion to a larger setup. Uses zero electricity and nearly 90% less water than a standard washer.

7. Lavario Portable Clothes Washer

  • Fully non-electric
  • Push-pull Powerflow agitation
  • 5 gallons per fill, gravity drain
  • Made in the USA, ~$80–100
Lavario portable non-electric clothes washer made in USA

The Lavario is the manual alternative that handles heavier loads — it’s the only fully non-electric washer here that can genuinely clean jeans and sweatshirts, not just delicates. A clothes basket sits in a water bucket; lifting and plunging activates Powerflow Technology, forcing water through the fabric on both the push and pull strokes. Gravity and buoyancy do most of the work, so arm fatigue is lower than it sounds.

A typical load runs less than 20 minutes start to finish. Lightweight, portable, no electricity needed. Made in the USA. At around $80–100 it’s more expensive than the Wonder Wash, but it handles bigger and dirtier loads. For RVs, boats, cabins, or extended camping without power, this is the most capable manual option on the market.

Download 906 survival guides bundle

Before You Get Started: Practical Reminders

  1. If you live in a four-season climate, winter air-drying is brutal. Clothes turn to ice on the line in freezing temps with little sun. Plan for indoor drying, a spinner, or a heat source.
  2. If you use a wringer, buttons and zippers will struggle and can break. Zip-tie a thin sponge around either end of the rollers — enough give to protect hardware, still enough pressure to wring. Turn clothing inside-out for zippers.
  3. Watch fingers, hair, and clothing near the wringer. This sounds obvious until it isn’t.

What To Look For

Size

Storage space is at a premium off-grid. Electric units need a dedicated nook — under-counter, in a closet, under a table. Manual non-electric units store almost anywhere, including a broom closet. The size vs. capacity tradeoff matters most for families: a household with multiple people will want the 10–18 lb capacity range, which justifies a larger footprint. A single person or couple can manage fine with a 5–8 lb unit and multiple small loads per session.

Power

This is often the deciding factor. With power available (cabin, RV hookup, generator, established solar), the electric models are far more convenient. The Giantex and KUPPET both run on 120V standard outlets and are conservative enough on wattage (260–310W) that a mid-sized solar battery bank handles them without stress.

Without reliable power — early solar setup without a large battery bank, extended camping, boat use, or a grid-down emergency — the Wonder Wash or Lavario are the answer. They require zero electricity and deliver genuinely clean clothes. A backup generator can also bridge the gap for electric units in an extended outage.

Capacity

Capacity is listed in pounds of dry laundry. A useful rule of thumb: one person generates roughly 7–10 lbs of laundry per week. A couple, 12–16 lbs. A family of four, 20–30 lbs weekly. Match capacity to your situation — undersizing means doing many small loads; oversizing wastes space and money. The 10–11 lb units in the middle of this list hit the sweet spot for one to two people.

Drying

Even the best spin-dry tubs won’t get clothes fully dry — they’ll be damp, not wet, which cuts line-drying time substantially. For anything beyond that, you’re hanging clothes or adding a standalone spin dryer. A dedicated spin dryer (separate from the washer) can cut drying time by half, which matters enormously in cold or humid conditions. The Charming Spinner (Amish-built, runs on battery or standard electric) gets high marks from homesteaders for exactly this reason — if you’ve had experience with one, let us know in the comments.

Gravity or Pump Drain

Gravity drain requires the drain port to be above your discharge point — meaning you usually need the machine elevated to drain into a bucket or low-clearance hose run. Pump drain lets the machine sit on the floor and push water upward to a sink or window. If you’re in a small or awkward space, a pump drain is worth paying for. Pump drain units require electricity, so manual-only setups are always gravity drain — plan your barrel or bucket placement accordingly.

DIY Washing Setups

The Windmill Washer

I live on the edge of the prairie, with several great wind farms within 10 miles. I’ve had a hankering to try building a wind-driven washing machine for a while — just as an experiment to see if I have enough consistent wind to make it work. My property sits in a valley with an old railroad truss blocking the west wind, which is what got me back thinking about laundry in the first place.

Windmill powered DIY off grid washing machine concept

The 3-Bucket Rinse and Wring Setup

One of the cleverest low-cost setups I’ve come across: three 5 or 6-gallon buckets stacked. The bottom bucket catches and holds grey water for garden reuse. The middle bucket has holes drilled throughout — you press clothes against it to squeeze water out. The top bucket has a lid, and you sit on it to apply pressure for rinsing. Simple, nearly free, and genuinely effective.

5 gallon bucket with holes for DIY laundry wringer setup

And on the drying side — the Charming Spinner. Amish-built (or at least Amish-sold), works on an off-grid battery setup or regular electric. No such thing as an energy-efficient dryer, but this spinner reportedly cuts drying time in half. Grey water is reusable. I save about $75 a year hanging clothes out in summer, but winter requires a dryer — I think the Charming Spinner would pay for itself in about two years. If you’ve used one, leave a comment — I’d love to know your experience.

Charming spinner off-grid clothes dryer

The Industrial Mop Bucket

Janitor mop bucket used as a DIY clothes wringer

A janitor’s mop bucket with a built-in wringer works as a clothes wringer in a pinch — accessible, cheap at any janitorial supply, and the wringer mechanism handles the squeeze work so you don’t have to. Pair it with a plunger-style agitator in a bucket for a complete no-electricity wash setup that costs under $30 total.

FAQs

How do I do laundry off-grid?

The process is more similar to conventional laundry than most people expect. You need a water source (pressurized faucet for the electric units, or manual fill for non-electric), detergent, and the washer. Electric models handle filling, washing, and draining with minimal intervention. Manual models require you to agitate — cranking the Wonder Wash, or pushing and pulling the Lavario basket — then drain and refill for a rinse cycle.

One important habit: discharge your wash water to a greywater collection if you’re conserving. Laundry greywater (with biodegradable soap) can go directly on garden beds or landscaping rather than down a drain. Over the course of a season, that adds up to meaningful water savings.

How do I use an off-grid washing machine?

For manual washers: fill, add detergent, agitate (2–5 minutes of cranking or plunging), drain, refill without detergent, agitate to rinse, drain. Heavily soiled clothes may need a second wash cycle. Wringing before hanging dramatically cuts line-dry time because manual washers have no spin cycle to remove excess water.

For electric models: load clothes, connect water inlet, position drain hose, select program and water level, start. Most will handle the wash-drain-rinse sequence automatically. Check mid-cycle on the first few loads to confirm the balance and water level are right for your setup.

How do I power my off-grid washing machine?

Electric units run on standard 120V — from a generator, a solar battery bank with inverter, or a wind setup. The 260–310W draw of the units on this list is manageable for a mid-sized solar array; a basic 400W panel and 100Ah lithium battery can handle a few loads per day. The price of solar and lithium has dropped significantly in the last few years, making this more accessible than it was. For full grid independence without power, the Wonder Wash and Lavario require nothing but effort.

What soap or detergent do I need?

All the units on this list accept standard HE detergent, homemade dry detergent mixes, or bar soap shavings. Unlike modern residential washers, none of these have delicate sensors that get gummed up by “wrong” detergents. Simple motors, simple pumps — they’re not picky. Use less than you think you need; smaller tubs mean less water and less detergent than your standard machine. A tablespoon of liquid HE detergent per load is usually sufficient.

What’s the difference between washers, wringers, and spinners?

Clothes hanging to dry after off grid washing

Wringers send clothes through two rollers that squeeze most of the water out mechanically. They’re slower (one garment at a time) and require care around buttons and zippers, but they work without electricity.

Spinners use centrifugal force — same principle as the spin cycle at the end of a conventional wash — to pull water out of a whole load simultaneously. Faster, less effort, and they tend to remove more water than a wringer. You can do a full load in one spin rather than feeding pieces through one at a time. On the whole, spinners are the better practical choice when you have the option.

Both are sold as standalone units separate from the washer, so you can combine any washer from this list with a dedicated spinner or wringer for a faster overall laundry workflow. For more on off-grid energy systems to power any of the electric options, see our dual-fuel generator guide and the broader off-grid living resources.

The Bottom Line

There’s no single right answer — it depends entirely on your power situation, your space, and how many people you’re washing for. Here’s the honest summary as of 2026:

  • Have power, want maximum convenience: Giantex Full-Automatic or the KUPPET Twin Tub for larger households. Both are well-priced relative to their capability.
  • Have power, need a large capacity: KUPPET at 18 lbs is the standout for families.
  • No power, solo or couple use: Wonder Wash. Cheap, simple, zero electricity, gets clothes genuinely clean in 2–5 minutes.
  • No power, heavier loads or bigger items: Lavario. The only non-electric washer that handles jeans and sweatshirts, not just delicates. US-made and worth the extra cost.
  • Budget is tight: Wonder Wash at ~$50 is the entry point. Pair it with a used wringer from an antique store or yard sale and you have a complete off-grid laundry setup for under $100.

Filed Under: Off Grid

  • « Go to Previous Page
  • Page 1
  • Page 2

Copyright © 2026 · Genesis Sample on Genesis Framework · WordPress · Log in

  • Privacy Policy