Solar cookers harness the power of the sun’s rays to heat and cook food. Because they use only the sun, they are not reliant on a source of fuel, like propane and wood stoves are. This makes them great as a backup cookstove for emergency situations.
Also known as “solar ovens”, “solar grills”, or “solar stoves”, these cookers are also awesome for people that live off-grid full time. While off-gridders will usually have a wood or propane stove for their primary cooking needs, having a solar stove allows you to take advantage of sunny days and save fuel. It’s also cleaner, quieter, and doesn’t emit any smoke or fumes.
There are a million uses for a solar cooker. They can be used to bake bread, cook chicken, heat water, make soups and stews and tons of other things.
So, how do solar cookers work?
To put it simply, solar cookers operate on the principle of reflection. With multiple panels that can be adjusted to capture maximum light, the sun’s rays are then reflected into the center of the stove, to create a concentrated area of heat (much like you might do with a magnifying glass).
What are the main types of solar cookers?
If you are looking around at these suckers, you will have already seen that there are basically 4 main types of solar ovens, that look and function slightly differently.

1. Box Cookers
This group includes the most conventional, “box with a lid” looking cookers. Most of them are rated to cook as high as 200-300 degrees Farenheit in good conditions.
2. Panel Cookers
These are the more scaled down, cheaper models that you see. They can be great cookers and are generally on the more affordable end of the spectrum, although their construction isn’t quite as sturdy, and coatings not always as reflective as other cookers.

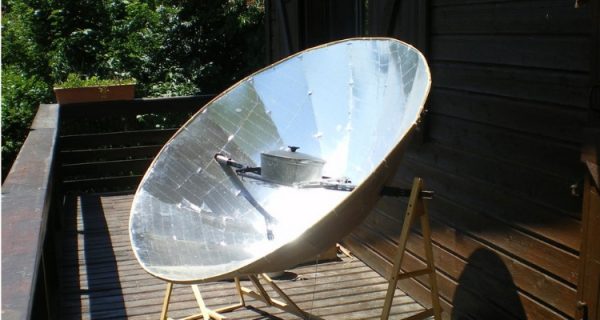
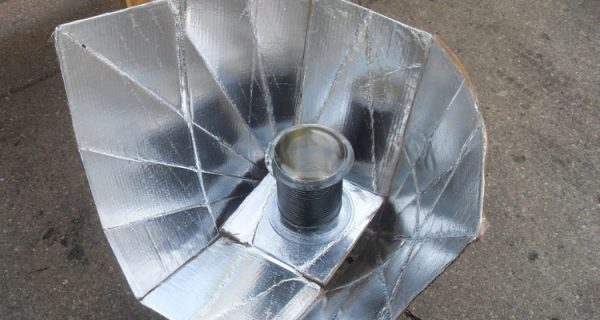
3. Parabolic Solar Cookers
Also called “curved concentrator cookers”, these are the things that look like metallic satellite dishes. They can heat up to 600 degrees, but they use a tiny little cookpot, making them not a good fit for many uses.
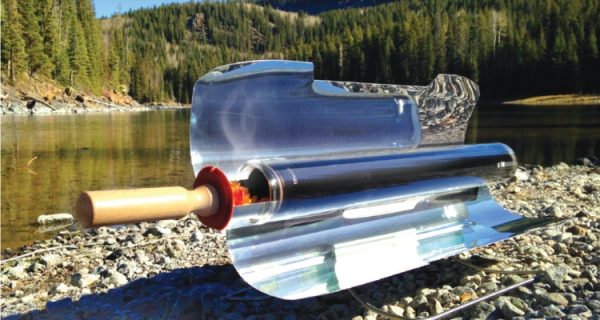
4. Gosun Style “Grillers”
The Gosun unit (and other similarly styled solar ovens) are nifty but a little limited in size/application (everything has to fit in that little tube). Plus, they are expensive as hell!
Within these 4 different types, you will see millions of different little homemade variations. You will also see some types of stoves that don’t really fit into any of the styles above (such as the tire cooker), but by and large, these are the main styles that you will see.
How long does it take to cook in a solar oven?
Like you might guess, it depends on what you’re cooking and how much sun is out when you’re doing it. It also depends on what type of solar cooker you are using, the size of your sun panels, the thickness of the pot you are cooking with, whether there are clouds in the sky, and even things like the temperature and altitude where you are cooking (although with solid enough sun, you can cook just fine even in freezing temps in the dead of winter).
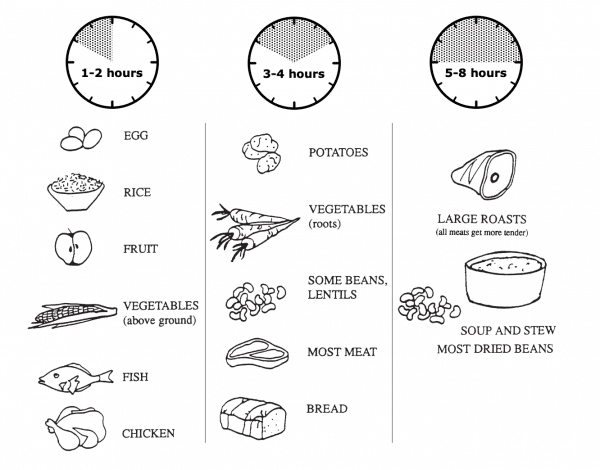
Here is a handy chart of rough time estimates to cook 4 pounds of food on a sunny day:
How much do solar cookers cost?
Commercially available solar stoves can be expensive. The official “Sun Oven” is listed at $349 (although you can usually find it for quite a bit less online). Folding panel cookers are less. The Sol Cook comes is very popular and sells for just under $100. As mentioned above, the Gosun is extremely expensive, with their “grill” model selling for $700 (I actually saw it on the Home Depot website listed for $822!).
However, there are also plenty of folks creating their own DIY sun ovens. With a little ingenuity and some household materials, you may just be able to come away with a cooker for much less.
DIY Solar Cooker Made Out of A Sun Shade
There are several different kinds of DIY solar stoves out there. One that I had often seen is an oven made out of a reflective windshield sun blocker. I finally made one, and when I did, I was surprised at the results. Works pretty good!

What You Will Need:
- Large reflective sun shade (Walmart, gas station or Amazon)
- 5 gallon bucket
- Oven bags (like the kind you roast a turkey in)
- Dark-colored pot
- Clothes pins, or something else to hold the sun shade in its conical position
How To Cook With It

I picked up a sunshade for $2, clipped it together in a conical/parabolic shape (like the pictures above), and added a five gallon bucket underneath.

Put your food in the pot, and then place the dark-colored pot inside the oven bag. It takes a few hours and works best if it is above 60 degrees, but you can cook without fuel!

The Slightly More Heavy Duty Solar Cooker
The sun shade solar cooker is awesome and does work, but it certainly isn’t heavy duty. If the pot is too heavy, the sun shade alone will not be able to support it. Then if it’s too light, it can be blown over in winds. Even if it isn’t blowing over, the sunshade itself can be blown around in the wind, causing less consistent exposure from the sun’s rays (and less heat).
For these reasons, I decided I would try my hand at putting together a slightly heavier duty solar cooker.

I scrounged up 2 plastic boxes in the basement. The bigger one is from some kind in-ground fountain that someone gave me, and the other one is some kind of bin.
Yes, the outside box could have been cardboard, but with snow and rain in Minnesota, and the potential for dogs getting into my meal, and given that I had one on hand, it just seemed like the thing to do. After all, the goal with this cooker was heavier duty.

I put a sheet of clear plastic in the bigger box and put a garbage bag around the smaller box. Then I put the smaller box into the bigger box and stuffed insulation all around it.
I pulled the smaller box out and taped it thoroughly. YES, I know that this insulation is frowned upon because of fumes, but in Minnesota, I believe in insulation! It is also thoroughly taped and as you will see, it will have a Mylar coating on it so that it should never even get warm.

Mylar on top of the insulation to reflect the sun’s rays and Mylar on the sides of the inside box – not sure about that yet, but I have another box with no Mylar that I’m going to test.

Then I looked for an old picture frame that I could use as a lid to the cooking chamber. I swear this solar cooker was meant to be because I had a picture frame with glass that fits it perfectly!

At this point I still wasn’t sure this was going to work, so I just cut my sides and top out of cardboard and siliconed on the Mylar. Then I duct-taped the flaps onto the box for a trial run.

A dark colored pot is preferred with solar cooking. The reusable oven bag is to add more heat and capture the heat from the pot.

This is the first test run. Got to 150 degrees in that snow bank!

This proved to me that it would work, so I cut up some quarter inch plywood I had laying around and re-siliconed the mylar onto the wood. I drilled holes in the wood and corresponding ones in the plastic, and used cable ties to hinge the flaps.
I put screws in the two outside flaps to lean the back on, for times when I wanted to get the solar rays at a better angle, and used garden twisties to hold them together. Then, I siliconed the glass to the picture frame, and ran some foam strip sticky seal that I had around the frame to ‘tighten” it a bit more.
So far so good!

I then put a screw in the frame so that I could tell where the full sun was. I have been experimenting with this, and the last test I did, the temperature was about 15 degrees Farenheit, and I got it to 225 degrees – not to shabby (this was with the cooker sitting on the garbage can, not in the snow).
More Iterations and Refinements
Although 225 degrees is pretty solid, I still want to refine this more.
I’m thinking another panel on the front. And a way to tilt it up. The cable ties snapped at just 5 degrees above zero so I replaced them with electric fencing wire. And I am looking for a glass container to put the cooking pot in because the glass will amplify the solar heating.

To make a riser for tilt, I cut three strips of wood and siliconed them onto the bottom of the box.

Then I took a scrap of 2×4 and a board, screwed them together to complete the riser.

Well, then I had to add more screws to the side flaps for more adjustments on the top flap.

I added a bottom flap that I made adjustable just by drilling a hole on either side of that and a hole in each of the side flaps and lacing garden plant ties through it.
Oops! Got so hot it warped and melted holes in the inside plastic box! So then I took some aluminum flashing scrap I had around and made an aluminum box for it, painted it black – I need to keep my eye out now for an old metal box, maybe a bread box or something for the inside.
All in All
So, with materials I just had laying around the house I created this solar cooker that is pretty much weather resistant, dog and cat resistant, not nice enough where anyone would want to walk off with it, and it all folds into itself so it is easily stored.
Why should I bother doing this now? My experience has been that even though someone on YouTube or in an article can do this or that, doesn’t mean I can. And there is always a learning curve! It didn’t cost me anything and I have the time right now to build it and learn how to use it.
If the grid should go down tomorrow for a month or a year, how will you cook (in reality, not in theory)? Do you have what you need and know how to use it?
Videos, Plans, and More DIYs
Printable PDF – One of the best downloadables I’ve found on solar ovens, how to make them, and how to use them. From Solar Cookers International.
Solar Cooking Wikia – Several plans and DIYs (basically the motherlode of all things solar cooking)
Solar cooking IS a PROVEN technology. That said, you have to have sunshine. In Minnesota the sun does not always shine, and it gets cold. At this post, we are again below zero at night… Will winter ever end???
Because the sun does not always shine, I am also creating a thermal cooker that can be used whether there is sun or not. Much like a Wonderbag, the thermal cooker I’m making is kinda like an off grid slow cooker. If interested, check it out here.