
Rainwater harvesting is one of the most practical water independence moves a homesteader or prepper can make — and the downspout diverter is the one piece that makes or breaks the whole system. Get it right and water flows straight from your roof into your barrels. Get it wrong and you’re mopping up overflow, or worse, directing water toward your foundation.
We’ve run rain barrels for years. The $7 DIY diverter below came out of two years of trying to solve this without cutting apart the gutters — it works on four barrels simultaneously. But we’ll walk through the three best off-the-shelf options first for anyone who’d rather buy than build, then get into the full DIY method step by step.
Table of Contents
The 3 Best Downspout Diverters
The diverter redirects water from running out the bottom of your downspout into your barrel instead. When the barrel fills, a good diverter automatically routes overflow back down the spout. A bad one lets overflow go wherever it wants. Make sure to get one that’s easy to install and reliable — you don’t want it failing in the middle of a rainstorm.
If you don’t already have one, these are the 3 best to check out:
1. Gutterworks Inline Downspout Diverter
The most versatile of the three. It connects directly to your existing downspout with no major modifications, and works whether your barrel sits directly below or offset to the side via a hose run. A simple lever flip switches it back to standard drainage when the barrel is full — no overflow, no mess. Available in 2×3 and 3×4 sizes and multiple colors to match your gutters. The unit is on the larger side, so measure your installation clearance before ordering.
Pros:
- Comes in two sizes (2×3 & 3×4)
- Multiple color options
- Works with barrel directly below or offset via hose
Cons:
- Larger unit — needs clearance room for installation
Best for: most homeowners with one or two barrels and a standard downspout setup.
2. Earthminded Flexfit Diverter

If you’ve ever tapped a maple tree, the Flexfit install will feel familiar — a tap-in approach rather than a full splice. Built-in overflow protection and installs cleanly into new or existing downspouts. The catch: it only fits 3×4 rectangular downspouts, so check your size first. Best matched to smaller collection setups — a shed roof, a single barrel directly below the spout — where the smaller opening isn’t a limiting factor.
Pros:
- Built-in overflow protection
- Installs easily into new or existing downspouts
Cons:
- Only fits 3×4 rectangular downspouts
Best for: smaller roofs, single-barrel setups, 3×4 downspouts.
3. Oatey Rainwater Diverter

Takes a few more steps to install but leaves your existing downspout structure essentially unchanged. Four feet of hose is included, giving you flexibility in barrel placement. One honest downside: no automatic overflow protection, so you need to either monitor your barrel or make sure the barrel itself has an overflow outlet. For most people who are actively using their collected water, this isn’t a real-world problem. UV-resistant coating means you can paint it to match your trim without losing durability. Fits 2×3 rectangular downspouts only — know your size before ordering.
Pros:
- UV coating survives painting — match it to your trim
- Minimal changes to existing downspout
Cons:
- No overflow protection — monitor your barrel or ensure it has its own overflow outlet
- Only fits 2×3 rectangular downspouts
Best for: 2×3 downspouts, flexible barrel placement, painted-to-match installs.

Downspout Extensions: Managing Overflow
Once your barrel fills, water has to go somewhere — and letting it pool at the foundation is not the answer. That’s how you get expensive structural damage over time. A downspout extension or splash block routes overflow away from the house toward a proper drainage area.
Extensions come above-ground and below-ground, permanent and roll-out, and virtually all of them are low-maintenance once installed. Some worth looking at: a flexible drain extension (can be directed around obstacles), rigid aluminum for a cleaner look, or a basic splash block as a no-fuss minimum. The right choice depends on how far from the foundation you need to move the water and how much you’re managing. Three good options to search for: Wholesale Plumbing Supply downspout extension, Flex Drain Downspout Extension, and the Lake Lite Splashblock.
Downspout Filters: Keep Debris Out
A downspout filter — also called a screen or strainer — sits where the gutter meets the downspout and keeps leaves, shingle grit, and debris out of your collection system. This matters for two reasons: clogged downspouts are a headache, and debris in your barrel degrades water quality over time.
The old knock on filters was that they didn’t work and were hard to maintain. That was largely true a decade ago. Current mesh designs do a real job and cut down dramatically on how often you need to clean gutters. If your roof sits under trees, a downspout filter is non-negotiable. If your roof is relatively clear, a basic mesh filter at the top of the downspout is sufficient insurance.
Choosing a Rain Barrel
The barrel is where the water actually lives. What you need: a spigot positioned high enough to get a watering can or bucket underneath (which is why elevating on cement blocks matters — see the DIY section below), a screened inlet to block mosquitoes and debris, UV-resistant material so the barrel doesn’t degrade in sunlight, and a built-in overflow outlet so excess water exits in a controlled direction.
The 55-gallon range is standard for most home setups — enough to make a real dent in outdoor watering, manageable enough to drain before winter. For water independence, linking multiple barrels in series is the upgrade: overflow from the first fills the second, and so on. Three worth looking at: the Upcycle 55-gallon, Mirainbarrel, and FCMP Outdoor barrel. For deeper water independence planning — storage, filtration, and what to do when the tap stops running — see our emergency water planning guides and the WaterBob review for indoor emergency storage.
Gutter Guards: Worth It If You Have Tree Cover
If large trees overhang your roof, a filter at the downspout alone won’t keep up — you need gutter guards spanning the full gutter run. Good guards mean less climbing, less cleaning, and cleaner collection water from the start. They’re an upfront investment that pays back in time and maintenance over years. If your roof is relatively clear, skip them. If you’re pulling handfuls of leaves out of gutters every fall, they’re worth the cost.
DIY: The $7 Removable Downspout Diverter
Sometimes buying a standard product doesn’t fill all the needs. This is one of those cases — none of the off-the-shelf diverters solved the problem of having four barrels, not wanting to cut apart four downspouts, and needing something that could be pulled off in 30 seconds before winter.
For less than $7 you can create a DIY downspout diverter for your rain barrel that looks good, removes in under 30 seconds in winter, and self-stores.
My Experience Creating a Rain Barrel Diverter
I’ve had my rain barrels for two years trying to figure out how to divert rainwater from the gutters into the barrels without breaking the bank. I didn’t want to take apart the gutters. I have four rain barrels, so that was sounding like a lot of work. After two years of thinking it through, I came up with this solution and love it.
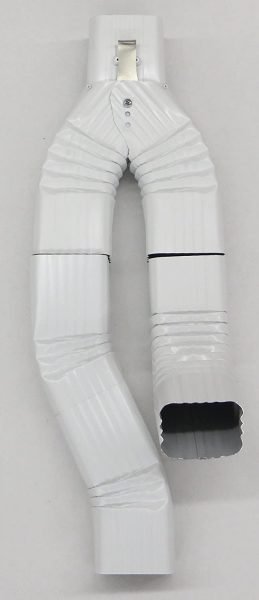
The first one I put in was horizontal. I tested it by throwing a hose on the roof, running water into the gutter — and out the water came. That’s when I noticed I needed caulk.
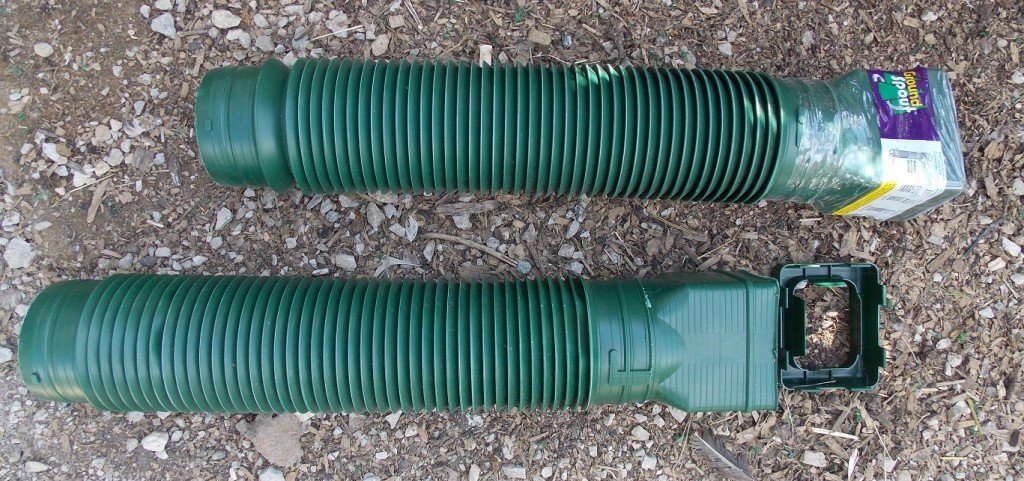
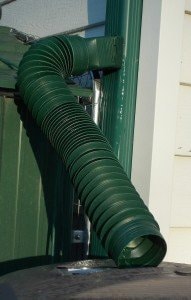
These are built from the “Ground Spout,” which I bought at Menards for about $5 or $6 each. Any hardware store should carry them. They mount vertically or horizontally on a standard 4-inch downspout.
How To Make a DIY Rain Barrel Diverter
What you need: 1 Ground Spout (~$5–6), a scrap piece of vinyl flooring, clear silicone caulk, small self-tapping metal screws, cotter pins, fishing line, tin snips or a jigsaw with a metal blade, and a drill.
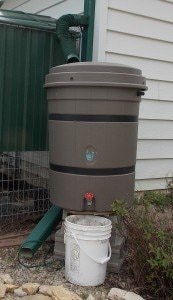
First, install and level your rain barrel. I used four stacked cement blocks to get the spout high enough to put a five-gallon pail underneath. I made treated plywood bases and tipped them slightly forward for drainage. If wind is an issue, put a cement block on top of the empty barrel to keep it from tipping. Note where your overflow valve is pointing before setting it permanently.
Then find a leftover piece of vinyl flooring and cut it to size. You should be able to enlarge the photos for reference if needed.
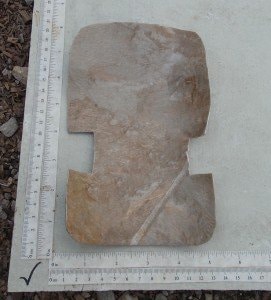
Figure out where and how you want the diverter placed on the downspout — horizontal or vertical both work. Pre-drill the corners of the rectangular Ground Spout piece. Trace the inside of the rectangular piece on the downspout with a Sharpie and mark your screw holes. Drill starter holes inside the marked area, then use tin snips or a jigsaw with a metal blade to cut out the hole. Don’t stress about perfection — it won’t show much, and in winter it’s mostly covered. Mash any sharp edges down with pliers.
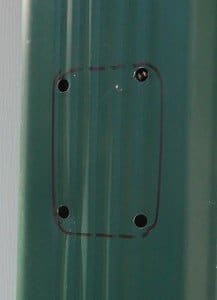
Pre-drill your screw holes with the right bit. Run a bead of clear silicone caulk all the way around the hole. Start your screws into the plastic piece before putting it against the downspout — trust me on this one, I dropped half a dozen screws learning this the hard way. Screw the piece into the downspout.
Fold the long side of the vinyl for insertion through the hole, then push it flat against the inside of the downspout. Trim with scissors as needed. Attach the ground spout hose and clip it in — any bend and it won’t stay put.
Pre-drill a hole through the top of the rectangular piece for a cotter pin, and another through the bottom of the round spout for a second pin. Drill a couple of holes for the fishing line where needed.
Fishing line is nearly invisible, extremely weather resistant, and lets you pull the pins, stow them safely for next year, pull the vinyl out and slide it into the spout, and set it to the side until spring — all in under 30 seconds. You could use a nail or screw instead, but the fishing line is what makes this truly self-storing.
Put the spout back in place and insert the pins. If you have a sharp turn in your setup you may need one screw — try to place it somewhere reachable without a ladder for winterizing.
Done for the year!
Ready to Give it a Shot?
Go to a hundred houses with rain collection and you’ll find a hundred different setups — and most of them work fine. The fundamentals are what matter: divert the water cleanly, filter out debris, store in a UV-resistant barrel with an overflow outlet, and route that overflow away from your foundation. Everything else is details.
A single 55-gallon barrel off one downspout after a decent rain is a week of garden watering. Four barrels in series changes the math significantly — which is exactly what this system was built to handle. For the broader water independence picture, the emergency water guides cover storage, filtration, and contingency planning. The preparedness downloads page has printable water planning checklists as well.