• Skip to primary navigation
  • Skip to main content

SCP Survival

Best Survival Gear and Supplies

  • Download Survival Guides
  • Survival Food List
  • Download 906 Survival Guides to Your Device
Home / Survival Food / Gardening / Page 2

Gardening

How To Get Free Mulch for Back To Eden Gardening

March 25, 2024 by Seasoned Citizen Prepper

Wood chips and mulch for back to eden gardening

If you have seen the “Back to Eden” video, you might be rethinking the way in which you garden. I know it opened my eyes to the value of wood chips and mulch, especially wood chips.

For those of us who garden, you know one of our biggest problems are weeds and grass strangling the life blood out of our gardens, and the energy out of us as we try to keep them under control. Oh, I know some may be saying, “Just go get some Roundup and that will solve the weed and grass problem.”

And you would be right. However, the problems it solves are more than offset by the problems it creates. But, that’s an article for another time.

After watching the “Back to Eden” video, I was convinced that this was the answer to our weed problem for our new enclosed, raised bed garden (future article forth-coming). However, finding the solution created an even bigger problem. Where to obtain large quantities of wood chips, without breaking the bank?

After several months of looking, I finally found the answer! It was here all the time.

We live in a rural portion of the Mid-South, and our county is served by a local Electrical Co-Op. One of their big problems is maintaining their power line right of ways. They have two crews that cut, trim, and chip trees and limbs all year. Recently I was driving home and observed one of the crews in action. I was so fascinated by what I saw. I pulled over to the side of the road and watched for a while. When they took a break, I walked over and started asking questions about their operation.

sky trim machine for mulch

Their odd looking piece of equipment is called a Sky Trim, which has a large skill saw type blade on the end of the long poll, and will reach 75 ft. vertically, and rotate 33 degrees to either side. I saw it in action, and believe me, it can do some trimming.

As we continued our conversation, I asked them, “What do you do with all those wood chips?”

The foreman told me “We’re always looking for places to dump them. On a good day we may fill as many as 5-10 truck loads.” The light bulb came on.

I asked what did they charge for the chips, and the answer was, “Nothing, nada, free! Just show us where you want them, and if we can get our equipment where you want them dumped, we will deliver them to you for free.” He said they would even drive 3-5 mile sometimes looking for places to dump the chips.

Wow! I had been looking and looking, and the answer was there all the time.
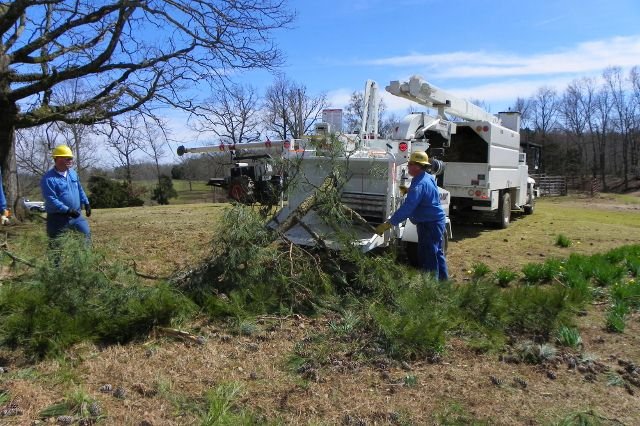
2 men feeding wood chipper Pic #3

We have since made friends with the crews, and now have wood chips delivered almost to our door steps. They have brought numerous loads to me and to my brother-in law as well. They told us when things dried up a little they would bring us all the chips we wanted. We have a 3 acre orchard already picked out.

These crews really work hard and the work is dangerous. After storms they really earn their money. They told me so many people are impatient and just plain rude; all they want is their power back on, the first thing they ask is, what took you so long? Those people didn’t realize that the crew may have been working all night, in the wind and rain, and sometimes ice and snow.

The point I am laboring with is this: Show these guys a little respect and kindness, and they will bend over backwards to help you whenever they can.

The crew you see are cutting a few extra trees near the power line that we wanted cut down.

If you don’t live in a rural area, get to know the tree trimming services in your area, they may be willing to give you the same deal. You never know, till you ask!
Filed Under: Gardening

Experimenting with Potato Planting Methods

March 25, 2024 by Seasoned Citizen Prepper

Up here in the North Country, Good Friday is the traditional date that we plant potatoes. Although I can’t see it happening this year with 18 inches of snow on the ground, frozen ground (Not the same, sometimes snow keeps the frost from entering the soil.), and just an occasional 40 degree day.

But potatoes are a mainstay in my garden.

We aren’t Irish, but it seems that potatoes enter a meal almost daily at our house—mashed potatoes, fried potatoes, baked potatoes, boiled potatoes, au gratin potatoes, potato soup, potatoes and creamed peas, you get the picture. POTATOES!

Potatoes are comparatively easy to grow and keep well. The only thing I don’t like about potatoes is digging them!

Experimenting with the Cage Method

Last year I tried the cage method with potatoes. Create a wire ring (I used 2×4 wire I had laying around.) about 2 feet across, plant your potatoes in a ring around the outside with the eye facing out and fill with light soil and compost, even straw or hay will work.

Layer upon layer, I got about 3 feet high. Wow, did I have potato foliage, but not too many potatoes. However, in all honesty, I think I let them get too dry at times. This method leaves a lot of area for moisture to evaporate from the soil. So was the lack of success me or the method?

What would I do differently? I think this year (As I have the cage already.) I might invest in a length of 6 inch PVC pipe and a cap. Drill holes up and down it, insert into the center of the ring and keep it filled with water.

Experimenting with the Bin Method

I also experimented with the “bin” method. Use an indeterminate potato (Russet flower all season long hence indeterminate.) and keep covering the plant as it grows leaving 6-8 inches of the top out of the soil. Worked okay in a bucket, not so good in a wire cage. Again, I think it was moisture given the drought year.

Growing Potatoes in Buckets

However, cutting the bottom out of a five gallon bucket and planting the potato in there and covering it seems to work! I only did a couple last year, but this year I plan to do more. What worked for me last year was 2-6 gallon buckets. I cut the bottom off with a circular saw, then cut the bucket in half—loved the two with the handles! Set on turned ground, put seed potato in eye up and cover with 8 to 10 inches of light soil. Tip over in the fall and gather your golden nuggets!

I have a new area of the garden that I am turning this year. I’m thinkin’ that what I am goin’ do is trench the potato row, put the buckets in side by side and use the trenched dirt to fill them. That should conserve on water if it is another dry year and save my back from both turning and bringing in coverage soil. But we’ll see!

Filed Under: Gardening

Pallet Gardening

March 25, 2024 by Seasoned Citizen Prepper

Spring is here. ‘Tis the season to be…….gardening!!

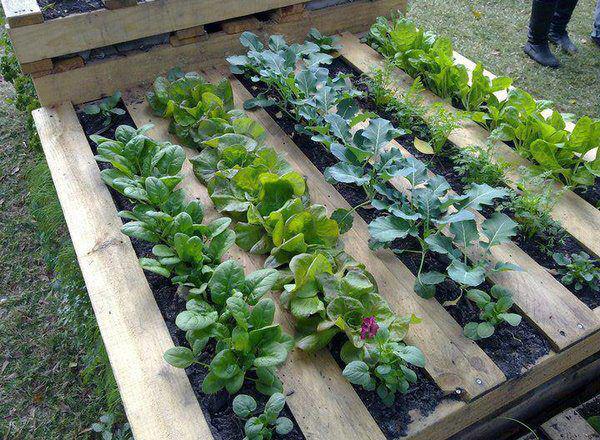
A neighbor friend told me about a method of gardening using pallets. The premise is placing a pallet on the ground, filling it with soil, and then planting vegetables and herbs between the planks of the pallet.

Pallet Gardening

This is not something that I have tried myself – but looks interesting. Anything that gets more people growing their own food is good by me. Many of the examples that I have seen people doing have some material laid under the pallet to minimize grass and weed growth through the pellet. Potting soil is often used – which is generally weed free.

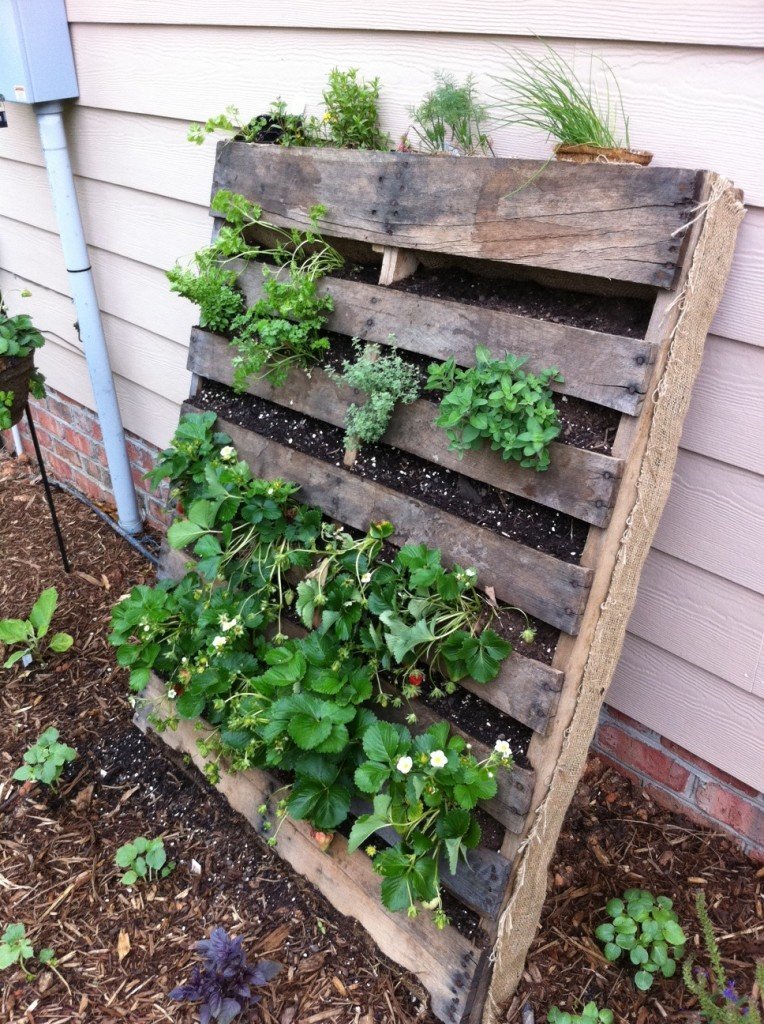
Gardening in Pallets

Other than laying the pallet flat – a vertical garden is established by leaning the pallet up against a structure – building, wall, tree…..whatever. Soil is kept within the pallet by placing landscaping fabric along the back.

Pallet gardening looks to be a great idea – especially for those with minimal space.

Filed Under: Gardening

The Beginner’s Guide to Guerilla Gardening

March 22, 2024 by Seasoned Citizen Prepper

When my parents retired and moved to New Hampshire back in 1970, my Mom became an avid, if education-averse, gardener, all of the short summer, trying, mostly in vain, to grow vegetables in terrible, rocky NH soil.

My Dad, on the other hand, spent most of the summer at the extended family’s fishing cottage, about 30 miles away. On trips to the tiny town dump, he discovered that the area he was instructed to dump his buckets of catfish guts was the same place that the town’s 2 diners had to drop off their raw kitchen waste. The large mound of “unintentional compost” was literally overgrown with tomato, potato, pepper, zucchini and onion plants, free for the picking.

Most of the time, he made himself some very good, free veggie side dishes during the week, and never mentioned it, just to keep the peace :)

Fill Empty and Unused Space with Food

If you are at all into gardening, you have probably heard something about the “Guerilla Gardening” movement. It is primarily an urban/suburban phenomenon, where folks transform ugly, abandoned patches of ground into vegetable or wildflower mini-gardens, using only some terra cotta clay from a hobby store, an old cheese grater, some dried compost or earthworm castings, or other organic fertilizer.

Generally, they use a little water and some native wildflower seeds to make “seedballs/seedbombs/seed grenades”, and pitching them over fences and such into unused pieces of land, based on the pioneering agricultural work of the Japanese farmer/philosopher, Masanobu Fukuoka.

The grenades start to fall apart after the first rainstorm, and “plant themselves”.

There are better descriptions of building your own seedballs than I could write at Seedball.


Why stop with wildflowers?  Consider some open-pollinated vegetable and herb seeds in the same usage.  Why stop with your own land?  Take a walk or a drive around “the neighborhood” and find some non-obvious open spots, to plant yourself some self-seeding backup crops?  Toss some “grenades” and make yourself a map, in case you want or need to go harvest your backup crop.  It’s a heck of a lot of fun to go back and look at your handiwork, as well :)

This could be especially-valuable if you are stuck in a suburban area.  A well-tended ‘monoculture row’ backyard garden might become a target for raiding by hungry neighbors, but some ‘random’ plants in an undeveloped area are not likely to attract much attention. Not that I have a low opinion of most people’s knowledge, but your average urban/suburban individual wouldn’t know a radish or bell pepper plant from poison oak, and probably wouldn’t even think to look, because it wasn’t on something close to a grocery store shelf.

How To Make Organic Seed Bombs of Herbs and Vegetables

I’m by no means an expert, but I suggest a mix of some of the following seeds:

  1. Perennial White Clover (tossed with the appropriate bacterial inoculant) Will make your plot look more “untended” and will fix nitrogen from the air into the soil for years – plant your own fertilizer.
  2. Radishes – the first vegetable that comes up in the Spring, and if you let it go to seed, it generates an unbelievable bulk of green compostable material.
  3. A few different leaf lettuces – tasty, nutritious, and since it’s not a head of iceberg, easily ignored by other hungry humans– could be some random weed.
  4. Onions – you can eat the sprouts, let them go to seed and bulb, and they will overwinter well. Chives are not a bad idea, either.
  5. Your favorite herbs – basil, thyme, oregano, parsley, etc. – the thyme and oregano will spread and maybe become “invasive” – if you’re eating it, not really a problem.
  6. (Some) squash seed – not many, be careful. They’ll shade out other plants, and a 50 lb. Zucchini in September may not be the tastiest thing you ever ate, but it sure beats eating nothing.
  7. (Very few) tomatoes and bell peppers. Pick “ugly” heirloom varieties. Perfect-looking bright red fruit could attract unwanted attention.

Get open-pollinated, non-hybrid, non-GMO seed.  You want “plant once, harvest forever” plants. I recommend Nichols Garden Nursery – http://www.nicholsgardennursery.com –  I have no stake in this company, just have been a happy customer for over 30 years. A VERY strict no-GMO policy, and all hybrids are clearly marked.

For more information about Fukuoka-san, and his farming methods, start here.

I know that his book “The One Straw Revolution” had a great effect on my views on the natural/spiritual aspects of growing my own food, even if no longer that applicable to growing my own in a suburban townhouse.

Filed Under: Gardening

Low-Rent Indoor Hydroponics

March 22, 2024 by Seasoned Citizen Prepper

Growing Indoors with Hydroponics
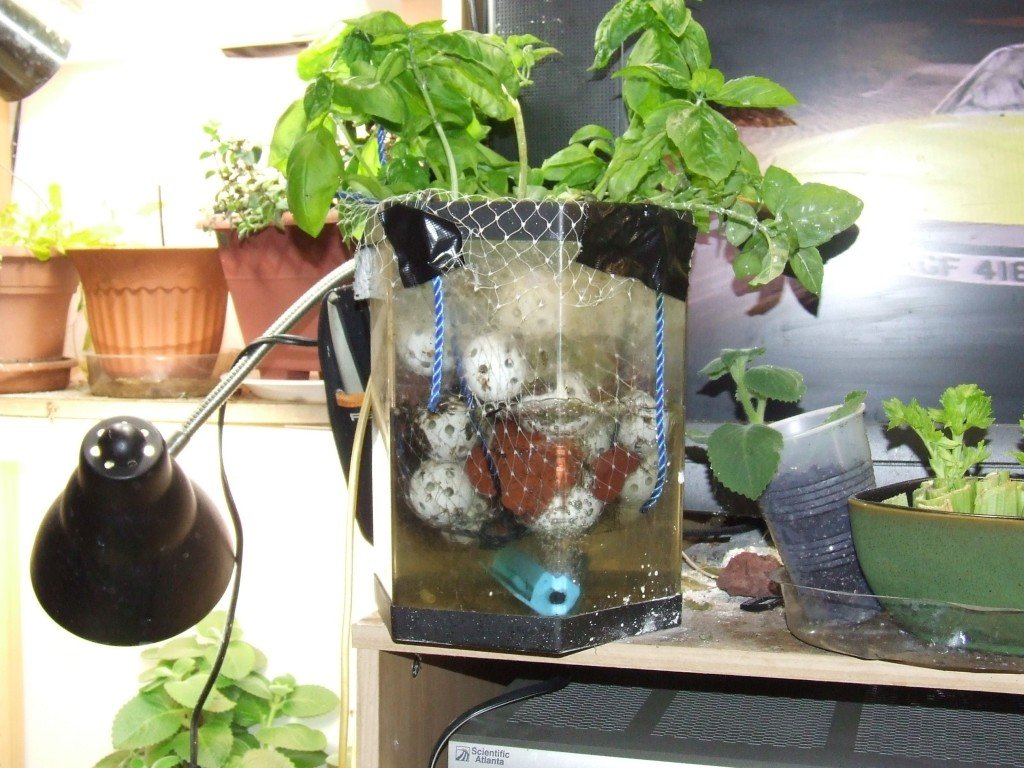
This particular tank has been going for about 5 months (and recently cut back for a batch of pesto)

A lot of gardeners have told me that they’d like to try indoor hydroponics, but don’t have the hundreds or thousands of dollars required for they initial setup. If you’d just like to ‘get your feet wet’ (pun intended) you can probably get started with less than a $20 investment (especially if you have abandoned aquarium equipment laying around)

Hydroponics Parts List:

  • a cheap aquarium air pump and tubing (I had this in a closet, collecting dust)
  • a large-ish airstone – mine was $2.95 at a chain pet store
  • a container ( I was given a 1.5 gallon hex aquarium as a gift, years ago – too small for fish)
  • A plastic net bag – the kind onions and potatoes are sold in at grocery stores
  • A pack of plastic “wiffle” plastic practice golfballs from a megamart (think mine were $2.18)
  • some polyethylene cord (Dollar Store special)
  • (optional) some lava rock (the kind sold for gas grills – very light weight – about $3 a big bag as I remember)
  • fertilizer (organic compost tea would be great)
  • plants (start out w/herbs or lettuce or spinach, not tomatoes, cool as that may sound)
  • water
  • Duck tape

If you don’t have access to an old aquarium tank, don’t worry.  A small plastic bucket or small office-type trashcan will probably work even better.  I like to check the air flow, but the less light that hits the fertilized water, the fewer problems you will have with unwanted algae in the water. Pick a container that you can easily stick your onion bag inside. Pick something about 9-10 inch diameter and around a foot tall.

If you so choose, thread some of the poly cord through the net bag as reinforcement. This is mostly a hangover from earlier attempts to use pea gravel as a growing medium, but backup never hurts.

Place your airstone into empty tank, finagle and tape down the air tubing to keep it ‘right-side up’ (this can bite you later if you don’t)

Place your onion bag into tank, with a couple inches overlap on the outside of the tank. Tape around it to hold the bag in place (Note: I removed outer tape wrap layer so pic would be more self-explanatory). Leave an inch or 2 free space above the airstone to let bubbles spread.

Set the tank someplace warm with good light. (I use a shelf with a clamp-lamp and a daylight CFL bulb) Pour in your bag of wiffle golf balls – this is your growing medium. Very light weight, full of holes to allow air flow. Plug in the air pump, fill “most of the way” with water and your choice of fertilizer.

Let it run without plants a day or 2, just to drive off and chlorine, etc. as needed, where you are. If you can’t find wiffle practice golfballs, check your closest Dollar Store for the funny-looking hard pink plastic hair curlers. I used these once in a koi-pond as biofilter-medium instead of $30/lb “BioBalls” and they ought to work here too. All they do is support the roots and stems.

Being lazy, as I said, I plant sweet basil, because I can get it pre-started in hydroponic medium from a local organic hydroponic farm at my favorite supermarket. (rich yuppies DO have their uses..) To use other plants, start with a “2-inch pot size” plant, with good root systems, and gently wash off ALL the soil from the roots. PLEASE do this outside, not in your kitchen sink, or I promise, you will regret it while snaking and plunging the drainpipes. Shove the roots down inside the golfballs by hand.  If the plant tends to be too floppy or too ‘floaty” just stick in a lava rock or 2 to brace up the structure.

Operating instructions:

  • Keep the airpump running all the time – you dont want the roots to ‘drown’.
  • Don’t worry as water evaporates- let it get down to about 50% full before refilling with water – free air for the roots.
  • Don’t over-fertilize- if you start seeing green algae, use a LOT less for the next month.
  • If you use artificial light, make sure your plants get 6-8 hours a day of dark time, or they will turn yellow.
  • Trim the leaves and make pesto, if you grow basil – it grows like a ‘bat outta..”

p.s. if you haven’t heard of it, you should check out “aquaponics“, which incorporates fish into a hydroponic system.

Filed Under: Gardening

Weeding Your Garden – The “Quick and Dirty” Way

March 21, 2024 by Seasoned Citizen Prepper

Sometimes stuff happens and the garden becomes a low priority. I’m writing this with a variety of scenarios in mind…

  • A SHTF situation, you bug out, come back a week or two later and NEED that garden to produce.
  • A personal SHTF situation and you come back and are overwhelmed by the weeds.
  • You discover someone else’s garden in weed mode and are trying to salvage it.

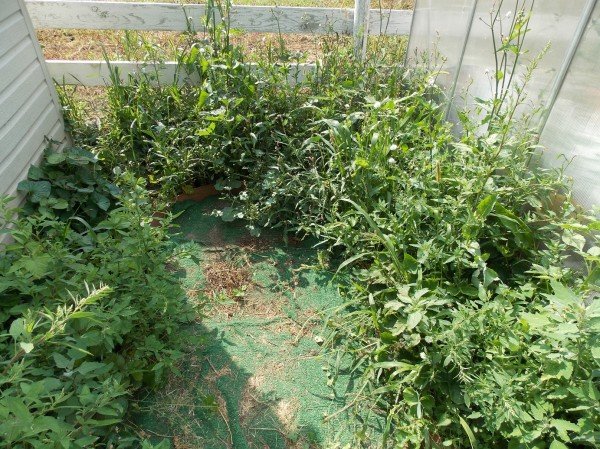
Whatever the reason, weeds happen. This is a small horseshoe garden area of – guess from this picture – that I put in this spring to salvage some plants. I am beginning to think my problem this year is the 3 year old composted horse manure I used as everywhere I spread it I got crabgrass and similar weeds.

weeding

I’ve ignored this spot, not even watering it in the now 6 week drought we have going, but I decided to do a show and tell and this will work well.

I timed myself – 10 minutes in this garden.

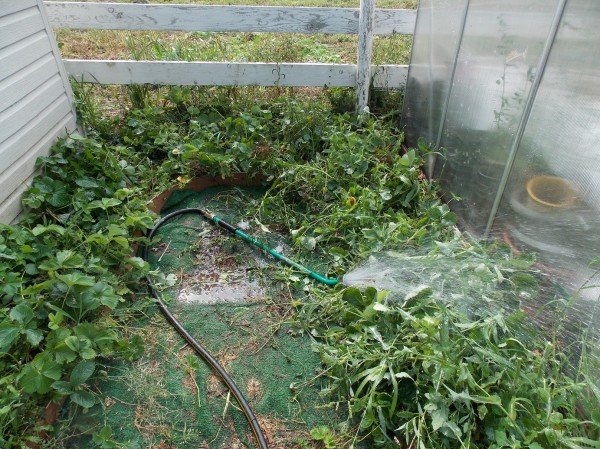
First I took the water wand and watered for about two minutes and then sat the wand down on one particularly bad spot in the weed patch. Weeds pull up a whole lot easier when the roots are wet. They are also less likely to disturb the roots of the desirable plants as you are pulling the weeks. Root crops don’t take well to being overrun by weeds and then doing this technique, but even with them you can often tuck the onions, etc. back in and get a harvest that you wouldn’t if you do nothing at all.

Here we are about 6 minutes into the 10 minute weeding. I knew I had planted strawberries, but could YOU see that? Unknown garden, attempt to identify what the crop is. Pull weeds ABOVE the crop if possible as an “overview weeding” to see what is left and get a feel for the roots/stems of the desired crop you do not want to weed out.

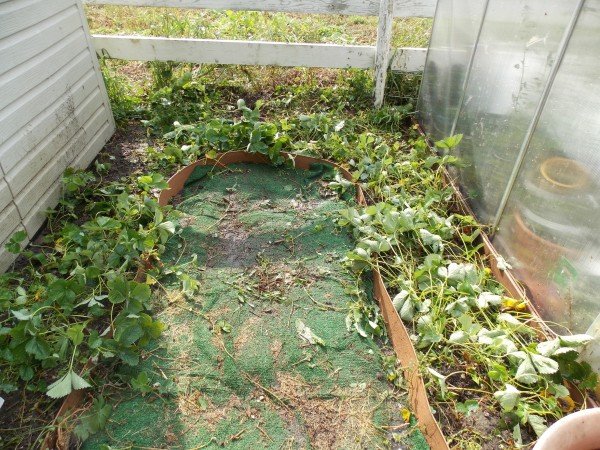
Four more minutes. I called time at 10 minutes. Lots of the weeds are out including the creeping charlie and violets that can look similar in structure to the strawberries.

This is not a perfect weed, but a lot of the strawberries are still there and thriving! Any I pulled out, I poked back in. They are starting to send out runners now. Shortly I will be starting a whole new strawberry bed where the potatoes are being harvested.

This little garden I am hoping to make into an outdoor potting area and lettuce garden – sheltered from the full force of the sun – next year.

So, now you know how to do a quick weeding and salvage your crop even if stuff happens and the weeds get the better of you!

Filed Under: Gardening

  • « Go to Previous Page
  • Page 1
  • Page 2
  • Page 3
  • Page 4
  • Interim pages omitted …
  • Page 6
  • Go to Next Page »

Copyright © 2026 · Genesis Sample on Genesis Framework · WordPress · Log in

  • Privacy Policy