We’ve had so much rain in the Deep South. Our back yard is “stepped”; the upper level does fine, as it drains well –right into the lower level! The bottom part of the back yard, the lower level, has stayed wet since January, and, it is still wet.
Yep. You guessed it. More rain coming. Woo. Hoo.
I was sinking in two inches of muck every time I walked across the lower level of the back yard. It was very difficult, and very frustrating, to try to work my gardens.
Guess what? The solution was FREE!
Yep. Free. Sturdy wooden crates from the garden center and some given to me by the guys replacing roofs from that awful hail storm last month. But, hey! It works. And it was free. It doesn’t get any better than that!
How To Build a DIY Pallet Compost Bin
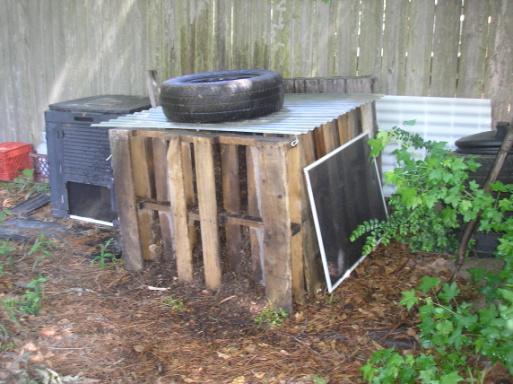
Here’s my compost bin, made from FREE oak pallets. They’ve been in use for three (3) years now, and still going strong. Simply lashed them together, 4 to make a “box”.
We always have a good assortment of “critters”, including big, juicy earth worms. We keep it moist, but not wet; we feed it with kitchen scraps (all but raw eggs, any meat, or dairy foods) and yard cuttings (chemical free), plus leaves every Fall. Yes, some of the compost material “escapes”; I just pitchfork it back in every now and then.
The screens help hold it in place, and the cover on top is held in place by an old tire because the raccoons were able to lift the 3’ long 2×6 board we were using to hold the cover in place! Tires were “free” in the sense that we took them off a car when we had new ones put on.
Fiberglas cover was leftover from a greenhouse build project in another part of the yard. The black plastic box above is our first compost bin; it did not hold up well ($50), especially as it filled up; we have plugged the openings from the inside with more of our window screens picked up in a yard sale for seventy cents each, and we keep twigs and starter wood in it now.
EVERYTHING can be repurposed. There is rarely any reason to put anything in the land fill, y’all. But our wood pallet system? It works well; it holds tons of compost, and it was free!
So then I used the contents to mulch my newly-planted raised gardens; it makes beautiful mulch.
The DS brought home something from work the other day that will work great for our melons to climb up and then rest across the top as the melons ripen; and it was FREE! (My favorite 4-letter word!). It’s in place in the garden, though you can’t see it here – a two-story, very sturdy powder-coated metal “cage” display thing that, otherwise, would be in the landfill now.
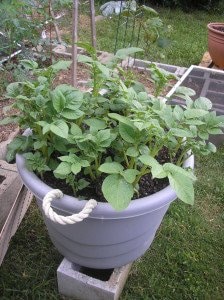
Planting and Growing Potatoes in Buckets
They are popping up like crazy. I bought SMALL red seed potatoes, because I did not have time to cut and cure the seed potatoes for two weeks, so I planted them whole. Man, are they growing! And, another one of my seventy cent yard sale screens at work here.
So, this is my garden, such as it is. Cucumbers, squash, tomatoes (4 varieties!), and concord grapes (out front). The lower level contains brassicas and beans, but, not showing them off just yet. I will be filling in all those “holes” in cinder blocks and growing companion plants; I have done this before and it worked out very well; so, these small raised gardens CAN produce a tremendous amount, if we utilize every available space for growing in them.
I am so very happy when gardening!
After a few days of sun, I’m finally able to walk in my lower yard without walking across the sturdy oak pallets, my “free wooden walkway”. The sun warmed us to over 90 deg. F yesterday, and the skies were blue, but with it comes the heavy humidity that is the bane of the Deep South.
Container plants and young seedlings are in need of watering twice a day, very carefully, of course. I have dozens of “volunteer” tomato plants that popped up after using my compost for mulch; normally, I wouldn’t try to grow from compost volunteers, but, I know a family much in need of food supply who likes tomatoes, so, we will be growing them.
I originally had about 50 green bean babies; the slugs and snails devoured all but about 20, some of them down to nothing but stalks. By setting the beer traps AND covering them at dusk with glass or plastic jars, they’ve grown new leaves and they are going to make it!
I also added a tiny bit of veggie fertilizer, which helped them recover, I do believe. I save every glass jar and plastic jar I can; I love to recycle things and keep things out of the landfill; I’m grateful that I had plenty of glass/plastic jars from peanuts, fruits, pickles, etc. I have plenty of canning jars I could use, but, I save those for canning – they’re precious to me. But I just cover my green bean babies in the evening with a jar, gently twisting it into the soil a bit to hold it in place, and remove them early the next morning; as hot as it is getting now, leaving these on for long would result in a cooked green bean baby, so, do keep that in mind.
The potatoes in a container are beautiful! This is the first time I’ve tried this method, and I could not be happier.
Here are two pics of my potato bin on day 1 and another pic on day 25:
Servantheart, Your garden is looking good and what a great way to use the space. I do container gardening to conserve water. The yield of course in much smaller but until this drought breaks is about all we can do. Re-purposed whiskey barrels is what I use for containers.
As for recycling built a worm/composting bed out of an old refrigerator and it is working great. We laid it on its back after drilling holes throughout the back for drainage we also left the doors on to keep the worms cooler in the hot weather. We started the process with a bag of garden soil and then started pilling in the fallen leaves and shredded paper plus every once in awhile I will sprinkle the top so it doesn’t dry out to much. We also feed the worms corn meal a couple times a month. They are thriving and next year we will have a lot of good garden soil to work with….. YEA plus if we ever get rain again we can go fishing with the worms…;o)
What a great idea, Suni! The recycled refrigerator, I mean. U so smart! I did not know about the cornmeal. Nice tip; thanks!
I forgot to mention that we live in the city, and there is a covenant restriction against plowing your earth for gardening! Doesn’t that just beat all?! But there’s no restriction against RAISED GARDENS! “Where there is a will, there is a way!”. :)
We use rainbarrel catch systems, which the DH built from instructions found online, and now we teach others how to build them. We buy our 55-gallon blue barrels for $25 each at the local farm co-op; we spend about another $25 per barrel on everything else we need, and make as many as we want. These, too, wouldn’t pass muster with the neighborhood association, I’m sure (although there is nothing in covenants/restrictions about them), but, they’re behind a 6′ privacy fence, so, oh, well! The first summer we used these, it knocked $25 a month off our water bill – just using the water captured off the roof with every rain. To get the water out, we simply turn the spigot and run it into a container. These are gravity fed, so, a long hose doesn’t necessarily work all that well with them. There’s probably a design change that would fix that problem, but, we’re not going to empty our 55-gallon barrels to find out – not anytime soon, anyway!
We have since built MORE rain barrels and attached them to each other, so when one fills, the next one fills.
This water is filtered before it enters the barrels; it would need to be shocked first, but it is quite potable, no doubt.
SUNI – Thank you for the very nice compliment!
I hope you have a blessed day.
The best thing I have found for natural pest control is diatomaceous earth. It kills all the bugs on the surface and is not harmful to humans or pets. You just have to wear a mask and goggles when you sprinkle it on because it is an inhalation hazard. Once it is on it doesn’t cause any problems.
Thanks LC –
Rourke
Hi, LC! Yes, I like DE, too; however, being asthmatic, I must be very careful with DE.
For those not familiar, DE can do serious damage to human tissue, just as it can to bugs; what is DE?
About.com posts this:
Diatomaceous earth is the powdered remains of diatoms, which were ancient, sea dwelling algae. While it feels like a fine, soft powder to humans, it is composed of millions of tiny, jagged edges that spell doom for a wide variety of garden trouble-makers. Diatomaceous earth works by cutting the pest, causing it to dry up and die. In the case of slugs and snails, DE can be sprinkled on the ground and on plants they eat, and the sharp edges will cut them as they slide across the diatomaceous earth. It is also effective if the pests consume it, since it will abrade them internally, causing eventual death as well. A mask should be worn at all times when working with DE, because it is very irritating if inhaled. It should be used sparingly, since it is equally damaging to beneficial insects.
It can damage the tissue of the lungs in the same way it affects bugs and critters, so, do be very careful handling it, and do not breathe it in, folks.
With all of that said, I DO use DE; it is very effective for controlling ants, slugs, snails (although I prefer the beer traps in the gardens!); we even used it to help get rid of bed bugs in an infested rental property once! It works.